Table of Contents
- Infinity Cover
- Thanks!
- Marathon Forever...
- Introduction
- Getting Started
- Main Screen
- Preferences
- Controls
- Game Interface
- Playing Marathon Infinity
- Weapons
- Network Play
- Troubleshooting
- FORGE: Introduction
- Key Definitions
- Menu Descriptions
- The Tools
- Setting Up Basic Map Parameters
- Tutorial One: A Simple Two-Polygon Room
- Tutorial Two: Windows & Platforms
- Tutorial Three: Liquids & Lights
- Tutorial Four: Sounds
- Tutorial Five: Switches & Terminals
- Tutorial Six: Objects and Polygon Types
- Tutorial Seven: Network Levels
- Tutorial Eight: Building Map Files
- Tutorial Nine: Advanced Features
- Forge Troubleshooting
- Forge: Error Messages
- Tricks of the Trade
- ANVIL: Introduction
- About The Files
- Using Anvil
- Legal: Selling Maps & Scenarios
- Credits
Chapter 1: Infinity Cover


 © 1996 Bungie Software Products Corporation. All Rights Reserved.
Back To Top
Chapter 2: Thanks!
Thanks!
Thank you for purchasing Marathon infinity. It is because of your support, as our customer, that we are able to continue to develop cutting-edge products. If you also bought Marathon and Marathon 2, then we think you’re totally the coolest person ever!
Please Don’t Pirate!
Don’t give Marathon Infinity to your friends, congressmen, lawyers, freedom fighters, etc. That would be bad.
Customer Support
As our customer, you are our most important asset. If you have any questions about how to use or install this software, please get in touch with us through one of the channels listed below. We are more than happy to help you out. Please keep in mind, though, that we do not offer hints by phone. Many questions can be answered via our web site: www.bungie.com.
Bungie Software Products Corporation
Customer Support
PO Box 7877
Chicago, IL 60680-7877
http://www.bungie.com
Telephone: (312) 255-9600
Facsimile: (312) 397-0502
If you want to buy our cool Bungie Stuff, call 1-800-295-0060 or e-mail sales@bungie.com.
Email:
Technical Support: macsupport@bungie.com
General Info: info@bungie.com
Sales: sales@bungie.com
Back To Top
Chapter 3: Marathon Forever...
Infinity: Marathon forever .....
You’ve been one busy security officer.
You repulsed the Pfhor attack on the colony ship Marathon, uncovered and reawakened the fabled 11th clan of the S’pht and their ancient AI Thoth, rescued the stranded human survivors of Tau Ceti and halted the Pfhor advance on Earth...
And you delivered yourself from your “service” to Durandal, the rampant A.I. whose taste for irony is second only to his unpredictability. Durandal, who at last sighting left to tool around the galaxy in a newly rechristened Pfhor vessel with a crew of S’pht comrades.
Durandal, true to form, left much unanswered...
In Infinity you’ll find reality is a flexible and ever-changing thing, where the very physics of your world change from level to level as you go from a soothing, Earthlike waterscape to a poisonous realm of vacuum, weightlessness and hard radiation in one teleport; and where shifting loyalties make meaningless the distinction between friend and enemy.
And you’ll also find answers, to what role you play in the saga, and the common thread that binds these minds and their stories together.*
You know how it works, but it doesn’t work that way any more. With Infinity, you can change it. Included are all of the tools necessary to make your own Marathon worlds from scratch, from tight and fast network arenas to sprawling multi-level scenarios. With Marathon Infinity, you have a game that never need end.
Have fun. *Hint: Durandal is not your father, and you will not join the Dark Side or rule the galaxy together as father and son. Sorry.
Back To Top
Chapter 4: Introduction
Report to Lh’owon Command
<Transmission to Pfhor High Command>
<From Tfear — Lh’owon High Command>
The battle on Lh’owon had gone according to projections: that to trap Durandal and end the Threat of Tau Ceti, we would, as we did with the Drinniol rebellion, be forced to use the “trih xeem.” Forcing a star into early nova has proved most satisfactory at destroying what we could not control.
To a commander, the presence of things beyond one’s control leads directly to the conclusion that they must be destroyed. In the countless encounters of the Pfhor Naval Arm, there has never been an ultimate defeat. We have, through our supreme power and tactics, always prevailed.
All of this explains why as our Great Admiral, and with my own destruction now completely assured, I give you, High Council of Pfhor, warning that we have met our demise. Yet it comes not from Threat of Tau Ceti as we feared, but from a being of such destructive power that to control it would be to control the universe.
What follows is my briefing of the events here on Lh’owon leading up to the current situation:
The trap we set for Durandal went off as planned. We tricked him into believing that we were weeks away from Lh’owon while, in fact, we were hiding in the outer Lh’owon System. We waited quietly while Durandal dispatched the garrison fleet’s picket ships, and we used the data from this battle to discover some of the modifications that Durandal had made to our captured scoutship.
When we sprung our trap, it appeared at first that our quarry had expected it, but we adapted our positions, surrounded, and disabled his ship with acceptable losses. We caused his retreat to a heretofore undetected station located in an asteroid field on the fringe of the Lh’owon system. (Of course, according to protocol, the appropriate officers were notified and executed).
Although he evaded destruction, he was nonetheless trapped. This contingency was taken into account in the overall battle strategy. The battle plan was proceeding according to acceptable parameters.
I ordered the deployment of the “trih xeem.”
Almost immediately, our enemy then began transmitting ridiculous warnings concerning some sort of ancient chaotic being trapped deep in the Lh’owon sun. Of course, at this point mercy was unacceptable. The time to end the collective dream of the S’pht had come.
I ordered the fleet to retreat to a safe distance, and waited for my moment of glory. What happened next is the reason for my warning at the beginning of this report and the destruction of the Western Arm of Pfhor Battle Group Seven.
The nova went off on time and for a moment our simple victory was assured. But then, in a pathetic failure of discipline, the fleet’s ranks broke in an all-out retreat. All quarters reported the same thing: half of the sun had gone nova, but the readings from the other half were impossible. It was as if the universe had forgotten its own rules.
I can’t tell you what’s going on now, I can only hope that this message reaches you through whatever is surrounding us. I gave the fleet general order “Attack at will” but none of our weapons seem to affect whatever we’re firing at. This battleship has only seconds of integrity left, and I have no more information except for Durandal’s warning:
“On the Marathon, I saw your stupidity through the lens of victory. And now I see it in defeat. Maybe it is fate that your ignorant pride would unleash this horror and destroy the galaxy.”
<end transmission>
<transmission accepted>
Back To Top
Chapter 5: Getting Started
Requirements
Marathon Infinity requires a Macintosh Computer or compatible with a 68040 or better processor, 13" 256 color monitor, system 7 or higher, and about 6 megabytes of available RAM. Advanced features such as 16-bit graphics and Ambient Sound require extra memory.
Installation
You can play directly from your CD-ROM. However, you will notice speed improvements if you copy the Marathon Infinity Folder to your Hard Drive.
If you are running less than system 7.5.x, download Sound Manager with Quicktime at www.quicktime.com.
Starting a New Game
To play marathon Infinity, launch the Marathon Infinity application. Click the Begin New Game button on the main menu.
Starting a Network Game
To play Marathon Infinity over the network you will need at least two Macintosh Computers connected via LocalTalk, Ethernet, or equivalent and at least two reasonably conscious and sentient beings to operate them.
Each player must launch a different copy of Marathon Infinity on their machine. One player chooses Gather Network Game; everyone else must choose Join Network Game. The player who gathers the game selects the joining players from the Gather Dialog Box and then starts the game by clicking the Begin Game button.
Back To Top
Chapter 6: Main Screen
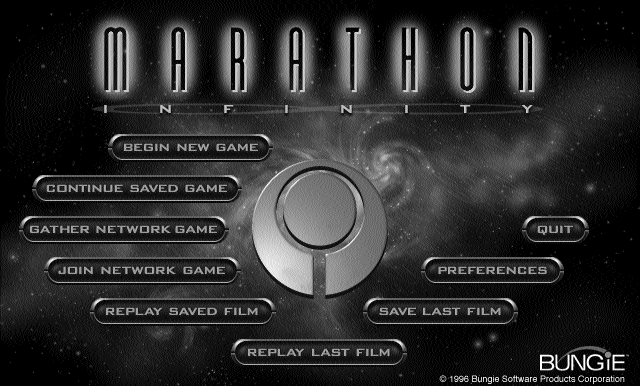 After launching the Marathon Infinity application you can choose from the options that appear on the main screen.
Begin New Game
Starts a new game in the one–player scenario.
Continue Saved Game
Restarts a previously saved game.
Gather Network Game
Initiates a network game.
Join Network Game
Allows you to be gathered into a network game (someone else must gather the game).
Replay Saved Film
Runs a playback of a saved game recording.
Replay Last Film
Runs a playback of the previous game.
Save Last Film
Saves a recording of the previous multiplayer game.
Preferences
Accesses the preferences dialog where you can customize various settings.
Quit
If you’re stuck here, you better go ask your mom.
Back To Top
Chapter 7: Preferences
Preferences
Pressing the Preferences button on the main screen allows you to customize how Marathon Infinity operates. There are five sections to the preferences dialog, each accessed from a pop-up menu. This chapter describes the features in the graphics, sound, controls, player, and environment preferences sections.
Detail High resolution mode displays the graphics as sharply and clearly as possible. Low Resolution mode displays the graphics one half as sharp as the Hi-Res mode for a three fold speed increase. Pressing function key F5 switches resolution during game play.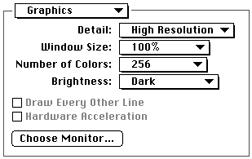 Window Size This menu lets you select the size of the window in which Marathon draws its graphics. Selecting Full Screen runs the graphics in 640 x 480 full screen mode without drawing the Marathon interface. 100% is the default option. you can make the graphics smaller for a big speed increase. F1 - F4 will switch window sizes during game play.
Number of Colors 256 displays graphics in 8–Bit, 256 colors. This mode is definitely faster than 16-bit mode. Select Thousands for 16–bit, 32,768 colors. 16-bit mode looks better and makes the lighting effects smoother. You might need to give Marathon more memory to access this feature.
Brightness Use this option to adjust the brightness of the game’s graphics without having to adjust your monitor. You can adjust the brightness with F11 and F12 during game play.
Draw Every Other Line This option draws every other horizontal scan line. This provides a speed gain only on machines with slow VRAM. It’ll look weird at first but you’ll get used to it after a few minutes. This can be toggled with F6 during game play.
Hardware Acceleration Some Macintosh models (only the Quadra 630, Performa 5200 and 6200) have a built in video accelerator. Choose this option to take advantage of the speed gain. The feature only operates in 16-bit, low res mode.
Choose Monitor If you have more than one monitor on your computer, press this button to select which monitor the game is displayed on.
Stereo With stereo sound enabled, sounds will be played through the speaker (left or right) closest to where they emanate in the game. i.e. if a monster is on your right, his sounds will play through the right speaker. This is really cool when using headphones!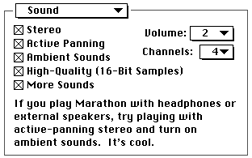 Active Panning This feature pans sounds between the left and right sound channels as their source moves. This is sorta like surround sound.
Ambient Sounds Want to hear the howling winds of Lh’owon or the raging cesspools of an abandoned Pfhor garrison? Turn this on.
More Sounds When enabled, this gives many sounds in Marathon Infinity several alternate sound samples (Such as the Bobs, who can say many different things). Turning this off forces items to have only one sound and saves memory.
Volume This sets the volume at which your speaker plays sound. Select “off” for no sound.
Channels The number of channels allocated determines the number of sounds that can be played simultaneously. I.E. if you have two channels allocated, two sound effects can be played at a time. a third sound will preempt one of the original 2 sounds. Reducing the number of sound channels will speed up the game.
Mouse & Keyboard Select this option to control turning, and looking up and down with the mouse. Other actions are controlled by the keyboard.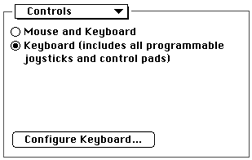 Keyboard Select this option to use the keyboard for game play. Also select this if you are using a Game Controller device such as a GamePad, QuePad or joystick.
Configure Keys... Allows you to customize the keyboard controls. (See the controls section)
Difficulty Level Allows you to determine the difficulty of the game. Babyboomers should play on an easy level, Generation X’ers play at higher levels. You may have to play a few times before you can make it through on the Total Carnage setting.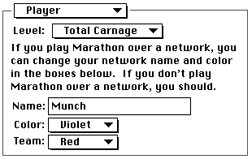 Name, Color, Team This information is used during network play. Give yourself a name (please try to be creative!) and a color scheme. The color scheme allows you to differentiate between net players. It’s fun and functional to pick a name & color and stick with ’em!
Map, Physics, Shapes, Sounds The Marathon program architecture is extensible. From time to time end users might create their own maps, physics models, sounds or shapes files and post them online. A great place to find them is at www.bungie.org or www.marathon.org. These are not offical Bungie sites. Bungie Software takes no responsibility for their content or upkeep. Download at your own risk. These environment prefs allow you to easily specify which add-on files to use.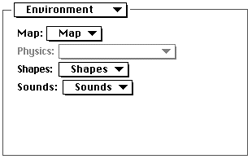
Back To Top
Chapter 8: Controls
Controls
You can control Marathon Infinity with the keyboard or mouse. A variety of third party input devices also work with Marathon Infinity including joysticks, game controllers, and VR Headsets.
In Marathon Infinity you have controls that do the following:
To pause a game press Command-P (This doesn’t work in a network game). To quit a game press Command-Q.
You can assign keys to execute the following functions: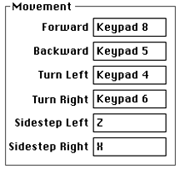
Forward Walk forward.
Backward Walk Backward.
Turn Left Rotates your point of view towards the left.
Turn Right Rotates your point of view to the right.
Sidestep Left Leftward Side Step. Side stepping is very handy for dodging enemy projectiles.
Sidestep Right Rightward Side Step.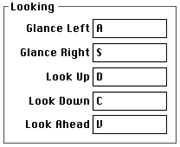
Glance Left Quickly rotates your view 90 degrees left of your current point of view. This does not actually rotate your body, only your head and weapon. Ultra-skilled vidmasters can glance, fire and score a kill on command.
Glance Right Quickly rotates your view 90 degrees Right of your current point of view. This does not actually rotate your body, only your head and weapon.
Look Up Looks up. Keep in mind that you fire in the direction you are looking. So, to fire at something up on a ledge, you need to look up at it and then fire.
Look Down Looks down.
Look Ahead This resets your vertical point of view to be straight at the horizon. This is useful after you have been looking up at something. Also, your pitch will automatically drift towards level once you start running.
Previous Switches your current weapon to the previous weapon in your inventory.
Next Switches your current weapon to the next weapon in your inventory.
Trigger Fires the current weapon.
2nd Trigger Fires the current weapon’s secondary ordinance (if it has any).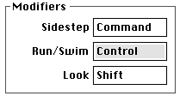
Side Step While holding down this key, the turn left/right keys function as sidestep left/right keys.
Run While holding down this key, the forward/backward keys move you at a running pace. If set to Caps Lock, you will always run if caps lock is down.
Swim While underwater, lava, or sewage, you can swim by holding down this key.
Look While holding down this key, the forward/backward keys function as look up/down keys.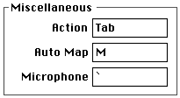
Action Opens doors, reincarnates you in a network game, and performs other helpful actions as noted.
Automap Displays “live” automap.
Microphone Activates microphone for broadcasting speech during a network game. Unfortunately, this feature is not available for Power Macs.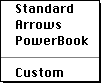
Layout In addition to setting up your own custom keyboard configuration, there are three default layouts you can choose from: Standard (numeric keypad), Arrow keys, and Powerbook.
Back To Top
Chapter 9: Game Interface
Game Interface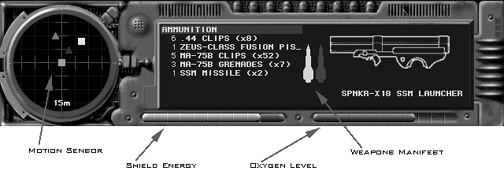 Motion Sensor
This handy dandy device detects moving bodies. Friendly motion patterns (civilians, or networked team members) appear as green squares. Hostile or unknown patterns show up as red triangles. Hostile network opponents appear as yellow squares. The green square in the center is you. If you don’t appear on your own motion sensor, it is safe to assume you aren’t showing up on anyone else’s. During some network games, like Kill the guy with the ball or king of the hill an orange pointer will indicate the direction of the guy with the ball or the hill.
Shield Energy
Displays the energy level of your suit’s shields. When this reaches zero you die. That’s bad.
Oxygen Level
Displays current oxygen levels. If this reaches zero while you are underwater or in a vacuum, you will asphyxiate. That’s also bad.
Weapons Manifest
The list on the left displays the weapons and ammunition in your possession. The image on the right displays the current weapon in use and its ammo level. During a network game, this area also displays vital network statistics. Pressing "[" and "]" toggles between item, ammo and weapons lists.
Back To Top
Chapter 10: Playing Marathon Infinity
Playing Maration Infinity
In Marathon Infinity, you find yourself caught in a web of ever-shifting allegiances. Durandal, Tycho, the Pfhor; each is a power, with its own agenda and its own uses for you. There are loose ends that need to be tied in the Lh’owon system, and you’ve got a reputation for getting things done.
You can’t be sure who the enemy is anymore. The only thing you can be sure of is a swift and bloody end if you let your guard down...
Navigation
You can control your character with the keyboard, mouse, or other third party devices. Check the Configure Keyboard dialog for the keyboard commands for moving. The default keys let you walk with the numeric keypad. You can side step (or dodge) by pressing ‘z’ and ‘x’. Side stepping is particularly useful for avoiding enemy fire. You can look up or down by pressing ‘d’ or ‘c’.
Marathon Infinity has a real physics model, complete with gravity and momentum. You can climb stairs, jump from ledges, dive into water, and be killed by nearby explosions.
Picking Up Objects
To pick up an object simply walk over it. If it doesn’t appear in your inventory, then you can’t pick it up. Accessing Computer Terminals
You can communicate with the local mainframe and/or gain access to other vitally important information from just about any computer interface you come across. To gain access walk up to the terminal and press the action key (Tab). Using Weapons
Fire your weapon by pressing the Space bar. If your weapon is equipped with a secondary ordinance or if you have a second weapon in your left hand, fire it by pressing the Option key. Your weapons and ammunition are displayed in your inventory. To switch weapons press ‘7’ or ‘9’ (on the keypad). Your weapon will automatically reload if you have spent a clip (assuming you have ammo for it).
Carnage is as easy as point and shoot. Different weapons are characterized with different dynamics. It is unwise, for example, to use the rocket launcher in close combat.
Swimming
While under water or sewage, you can swim by holding down the run key!
Reincarnation
To restore your game to the last spot you saved before dying, or to reincarnate during a network game, press the action key [Tab].
Quitting The Game
To quit the game, press [Command] [Q].
Saving The Game
To save your game, you must find a pattern buffer device which can look like the graphic displayed here. Walk up to it and press the action key and your complete biochemoelectrical pattern is stored for later retrieval. Handy, eh? Automapping
Your battle armor is equipped with a relative navigational computing instrument. You can access the nav data by pressing “M” on the keyboard. This displays an overhead view of terrain you have visited. You can walk around while viewing the automap. Your location is marked by a red arrow. Civilians are identified as blue squares. Non-catalogued biomasses (such as the pfhor) do not show up on the map.
To zoom in/out on the map press ‘+’ and ‘-’.
Opening Doors
To open a door walk up to it and press the action key. There are rumors of secret doors. My guess is that the action key will open those too (if they exist). If a door doesn’t open it might be locked or damaged. Switches
If you encounter a switch panel like the ones shown here, you can throw the switch by looking at it and pressing the action key. Switches can activate/deactivate lights, doors, or platforms. Energy Recharges
You will, inevitably, take some damage while battling the enemy. Lucky for you, your suit has a universal coupling recharge plug that will fit into sockets like the one shown here. Oxygen Recharges
Your suit provides a complete environment for you including precious oxygen. If you spend a lot of time in vacuum or under water (if I know you, you’ll be in the sewage all day!) you will need to recharge your oxygen supply at a panel like this.
Power Cells
You may encounter a power cell like the one pictured here. Pick it up to get your shield energy restored. Civilians
If you thought the pistol-packing Bobs in Marathon 2 were tough, then you’re in for a surprise. These new “vacuum” Bobs kick major booty. Biobus Chip Enhancements
Biobus Chip Enhancements (BCE’s) are plug-ins for your suit and helmet. They have self-contained power sources which last only for a short period of time. When acquired, their effects take place immediately.
Transparency
This makes you transparent. These can run in parallel, so you become more transparent after each one you pick up. You are undetectable on motion sensors and most of the aliens won’t be able to track you very well.
Extravision
Extravision extends your peripheral vision to 180º. Hypervision
Hypervision creates a visual image of the world based on a composite of light, heat, electromagnetic, and radar waves. The resulting image tints the world blue, humans yellow, the pfhor red, and items green. Super Shield
Super Shield casts a high frequency particle shield around the user, resulting in virtual invulnerability to physical harm. (Note: Emotional trauma is still a possibility). The user’s body will glow with a static sheen. High energy weapons can still penetrate this shield.
Back To Top
Chapter 11: Weapons
Weapons
.44 Magnum Mega Class A1
The new standard issue sidearm for all field personnel doesn’t look much like your old .45 MMC, does it? That is because it has been built for a single purpose, by a dedicated people and not by underpaid laborers toiling for a thinly-veiled government-owned arms manufacturing machine (oiled with the blood of the underclasses, by the way) which exists solely to line the pockets of the greedy bureaucrats who run the military/industrial complex.##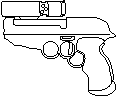 MA–75B Battle Rifle (with integral 40mm Grenade Launcher)
The original M .75 was a ridiculous toy designed to impress
aging pompous generals. Gone are the preposterously short barrel and the prodigious recoil that made firing the weapon akin to wrestling a greased pig. Still here is the oxygen hungry ammunition that makes it impossible to fire in vacuum.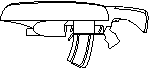 Zeus–Class Fusion Pistol
The S’pht have done their best to create an infinite supply of fusion batteries out of the finite number you were transported on board with. If it were not for their ingenuity and industrious nature you wouldn’t be able to run around firing with reckless abandon at everything that moves as you are wont to do. But, like the hundredth copy of a third generation duplication of a substandard bootleg — they’re a little fuzzy. One might even say unstable.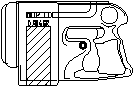 SPNKR–XP SSM Launcher
A self-important human once said “... sometimes a cigar is just a cigar.” This may be so, but in the case of the SPNKR-XP you’ve got one majorly explosive cigar.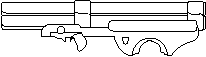 WSTE–M5 Combat Shotgun
While going through some data I appropriated from the Marathon (looking for design notes, of course) I stumbled across a reference to a weapon used by Imperialist forces against the inserectionists during the Ares Raid; July 14, 2444. (Never heard of it? I’m not surprised!) Many years of loving craftsmanship went into the design and construction of this brutal tool of mayhem, I hope you can appreciate that. I won’t waste my time trying to explain the loading mechanism to you — your primitive mind could never grasp its complex nature. TOZT–7 Backpack Napalm Unit
I don’t believe it is necessary for me to state the personality disorders evident in an individual who enjoys, or more accurately revels, in spraying their enemies with flaming napalm aerosol. KKV-7 10mm SMG flechette
...the flechette, with its small cross-section (4mm), longer body and pointed nose experiences far less wind resistance and thus retains more muzzle velocity over a greater distance with a flatter trajectory than its less advanced “slug-thrower” counterparts. its armor piercing capabilities rival those of the mighty M1A2 .75 BR and the bio-organic trauma it inflicts is terrifying (being somewhat less effective against mechanical targets).
Back To Top
Chapter 12: Network Play
Setting up a Network Game
With Marathon Infinity you can engage in competitive and cooperative network scenarios with friends over a network connection. There are different network maps to choose from as well as different kinds of network play (everyone for themself, tag, kill the guy with the ball, King of the hill).
To play Marathon Infinity over the network you will need at least two Macintosh Computers connected via LocalTalk, Ethernet, or equivalent and at least two conscious and sentient beings to operate them. Each player must launch a different copy of Marathon Infinity on their machine. You cannot network between copies of Marathon 1 or Marathon 2 with Marathon Infinity or play via modem or TCP/IP.
One person must serve as the gatherer. This is usually the person with the fastest computer (or most intimidating physical characteristics). Everyone else must join the game by pressing the Join Network Game button on the Main Menu.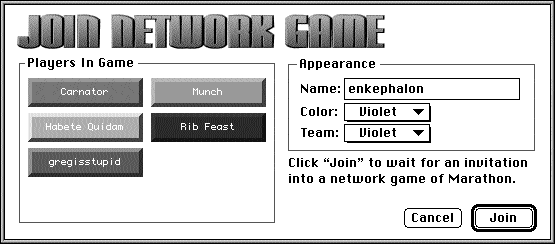
Pressing the Join Network Game button gives you the Join Network Game dialog box. Type your name (you should be creative here) and select your team color. Then press the Join button. Once the gatherer has added you to the game, a list of all the players will appear in the Players In Game box.
Pressing the Gather Network Game button allows you to setup the game’s parameters and gather in joining players. In the Setup Network Game dialog you are responsible for selecting certain network and game options.
Network Options
Select your type of network from the Network pop-up menu. An improper setting here will result in poor performance. Note: Abnormally slow Ethernet networks may play faster if this menu is set to localtalk.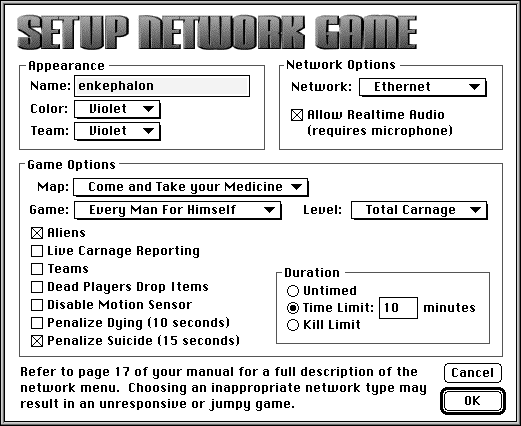 You can talk to other players over the built in microphone on your mac. Select the Allow Realtime Audio Checkbox to enable this feature. This feature is not available for Power Macs.
Game Options
Select the difficulty level from the Level pop-up menu. The difficulty levels determine the types and ferocity of the monsters in the game.
Select the map to play on from the Map pop-up menu.
Select the type of game to play from the Game pop-up menu. Here’s a run down on the different types of games:
Every Man For Himself The objective here is to kill everyone else and not die. The one with the best kill ratio (kills to deaths) wins.
Kill The Guy With The Ball Objective is to possess the ball (which is actually a skull) for the longest amount of time. When carrying the ball, running is disabled. Also, you can’t use any weapons when you have the ball, however, pressing the fire key will make you drop the ball and then you can fire. The motion sensor displays an orange indicator directing you to the location of the ball.
King Of The Hill Objective is to stand on the “hill” the longest. “hill” in this sense is just a figure of speech, it could be anywhere on the map and is indicated by the orange pointer on the motion sensor. Note that everyone else is trying to do the same, and they will most likely try to kill you if you get in their way.
Tag The first person to die is “it”. If you’re “it”, tag someone (by killing them) and then they are “it”. The objective is to be “it” the least. The magic orange indicator points to whomever is “it”.
Team Play Team play divides everyone into teams by the colors chosen in the Join or Setup dialog. The objective of each team is to kill members of different teams the most. You can see your teammate’s point of view by pressing the delete key.
Cooperative You can play the game scenario cooperatively with other network players. The objective is to complete the Marathon Infinity Scenario as a team (i.e. cooperatively). All players teleport to the next level when the first person does. When a player dies, he drops his stuff. (don’t die in the lava with the shotgun!) You cannot Save when using this feature.
More Network Game Options
Aliens
With this option selected, there will be aliens in the game (They’ll be trying to kill you just like the other human players).
Live Carnage Reporting
With this selected, game statistics are displayed in the weapons manifest area of the interface as the game progresses.
Teams
This lets you play in teams. When selected, it keeps track of kills vs. deaths by team color in addition to individually.
Dead Players Drop Items
When you kill someone you can get their stuff! Their weapons drop on the ground right next to their lifeless corpse.
Disable Motion Sensor
This option turns off the motion sensor for all the players in the game.
Penalize Dying (10 Seconds)
When selected, players must wait 10 seconds before reincarnation. Otherwise players may reincarnate instantaneously.
Penalize Suicide (15 Seconds)
When selected, players must wait 15 seconds before reincarnation if they killed themselves. It is possible to kill oneself by being to close to one’s own exploding ordinance.
Duration
Untimed games last forever, or at least until all players quit the game.
There are two measurements by which to end a network game of Marathon; time and Kills. Select the Time Limit radio button to determine a game’s end by time, and select the Kill Limit radio button to determine a game’s end by kills. Type the value (time limit or kill limit) into the text box.
The Gathering
Once all the options are set in the Setup Network Game dialog box, you then gather in other players in the Gather Network Game dialog.
Select players from the list on the left of the dialog. If you have a multi-zone network, a zone pop-up menu will appear at the top of the player selection list allowing you to add players in different zones.
Once all the players have been added press the OK button and the game will begin! “In the end there can be only one...”
Using the Mic
To send a “live” voice message to the other players in the game, hold down the microphone key (~) and speak into the microphone. Note that the sampling rate is very low, so the audio will sound a little garbled (just like it is on most alien spaceships). This feature is not available for Power Macs.
Post-Game Carnage Report
After each network game of Marathon Infinity a Post Game Carnage Report is generated. The report displays data three ways:
Total Carnage
This graph shows each player’s kills and deaths and ranks players according to the ratio of kills to deaths.
Individual Carnage
You can view an individual’s performance by selecting their name from the pop up menu (you can also cycle through the graphs with the up and down arrow keys). These graphs show an individual’s performance against each of the players listed.
Game Type Stats
This graph shows the relevant stats for each game type, i.e. total time carrying the ball (for Kill The Guy With The Ball games), or Total Time “it” (for Tag), etc.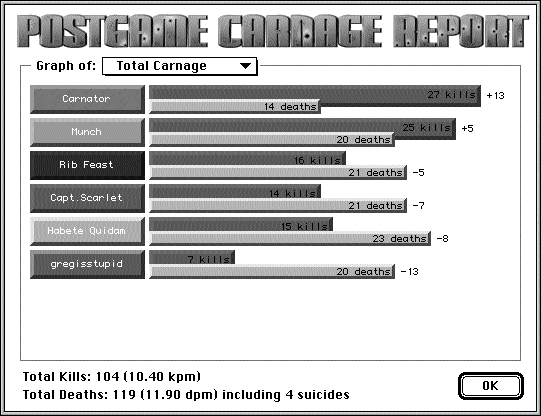 Replays
Marathon Infinity has the ability to record games as films for later playback. The film is just like watching a movie of a game of Marathon Infinity. You can fast-forward or slow-motion and you can save the film to disk for watching later. You also have the ability to view the film from any player’s point of view (for a networked game). Films will only work correctly on network games, although single player levels will work as long as you don't teleport between levels.
Game Recording
Every time a new game is started, Marathon Infinity will record that play session into the Marathon Infinity film buffer.
You can watch the contents of the Marathon Infinity film buffer by clicking Replay Last Film on the main menu.
You can save the contents of the Marathon Infinity film buffer to disk as a film file (so you can watch it later, or show it to friends) by clicking Save Last Film on the main menu.
To watch a film you have saved to disk, click Replay Saved Film on the main menu.
Replay Options
To fast-forward during a replay press the right bracket(]) key on the keyboard.
To slow down the playback press the left bracket ([) key.
To change to a different player’s point of view press the delete key.
Back To Top
Chapter 13: Troubleshooting
Troubleshooting
Marathon Infinity is crashing inexplicably!
There’s usually a simple solution to mystery crashes. Try the following avenues BEFORE you call us for tech support:
- Are you running RAM Doubler, Speed Doubler, After Dark, Virex, or Now Utilities? In general, it’s best to disable all third-party extensions and control panels before playing Marathon.
- Are you running on a standard Mac, or have you added third party hardware? Clock-chippers, accelerator boards and third party video boards can conflict with Marathon. Try disabling or removing them and see if the problem disappears.
- Are you running the game straight out of the box, or have you added or changed maps, shapes files, sound files, or physics models? Some third-party add-ons for Marathon do not work well on all machines. Try reinstalling a fresh copy of the game.
- Have you tried trashing the Marathon Infinity Preferences file in your System folder? Corrupted Prefs files can cause a number of problems.
- You might also want to try zapping your PRAM (when you start the Mac up, hold down Command, Option, P and R until the machine restarts itself). This can clear up Type 11 errors on PowerMacs, among other things.
- Look for updates to your system software at Apple's web site, www.apple.com.
Why can’t I access all of the options in Marathon Infinity’s Preferences?
Most often, it’s because of a lack of memory. Quit out of the game, open up the Marathon Infinity Info window (click once on the Marathon Infinity application to highlight it, then go to the File menu at the top of the screen and pick Get Info), and increase Preferred Memory Size by 1000K or so.
If networking options are unavailable to you, make sure Appletalk is enabled in your Chooser and restart. If some sound options are unavailable, make sure you have properly installed Sound Manager 3.1 or higher which comes with Quicktime. It is available for download at www.quicktime.com.
I have more Questions! Help!
The READ ME file on the Marathon Infinity CD-ROM has more troubleshooting questions and answers. You can also visit our web site at www.bungie.com where you can get frequently asked questions answered. If all else fails e-mail us at support@bungie.com or call our tech support department at (312) 255-9600.
Back To Top
Chapter 14: FORGE: Introduction
 Introduction
Forge is the powerful map-making tool used by Bungie to create levels for Marathon, Marathon 2, and now Marathon Infinity. We’ve included Forge with Marathon Infinity so that you can create your own fantastic Marathon worlds and share them with friends or upload them to the ‘net.
Forge uses a simple 2D perspective to create lines, polygons, and to place objects, sounds, and lights. It also utilizes a cool 3D perspective for texturing, adjusting heights, and fine tuning the map’s look and feel.
Although Forge is a complicated tool, it is extremely intuitive and easy to learn (provided you’re willing to read a little and watch the tutorials we’ve included on the CD-ROM). In the following pages we’ll be covering key definitions and descriptions you’ll need to get familiar with (computer geeks like us love to use weird definitions so bear with us). Later on, we’ll be going through a few step-by-step tutorials that’ll walk you through the map making process. But first, watch the Forge tutorial movies included on the Infinity CD-ROM and then come back to the tutorials in this manual for more detailed instructions.
Back To Top
Chapter 15: Key Definitions
Key Definitions
Level
A single environment, with an entrance and exit, that uses a single texture collection. Designed for single or multiplayer play. Also known as a Map Level.
Network level
A single environment, with at least a single entrance but without a user-activated exit, that uses a single texture collection. Designed for multiplayer combat, without save stations or computer terminals.
Map
A collection of levels and/or network levels that have been ‘merged’ into a single, stand alone collection.
Merge (Merging)
The process of stringing together a collection of levels, like the map included with the Infinity application. In addition, a merged map may contain terminal text, terminal pictures, and for Marathon Infinity levels, level specific physics models.
Polygon
A level in Marathon is basically a bunch of polygons connected together. What’s a polygon, you ask? Well, the technical term is, “a closed figure bounded by three or more line segments.” For example, a triangle is a polygon with 3 sides, while a square is a polygon with 4 equal sides. A polygon in Marathon can have a maximum of 8 sides (octagon) and a minimum of three (triangle). In Marathon, these polygons have to be convex (not concave). This means that all angles inside a given polygon must be <180 degrees. A good way to think about convex polygons is if you tried to put an imaginary rubberband around a polygon and the rubberband does not completely touch one of the sides, then the polygon is not convex. If the rubberband touches all sides, then the polygon is convex.
In the diagram below, the second polygon is not fillable (a term discussed later) because it is not convex. However, by adding a line (where the two dark circles are in the right diagram below), you can make two different polygons that are convex.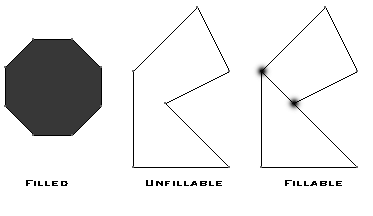 Line
Line
A line connects two vertices. lines can be either solid, transparent, or empty. Players cannot pass through solid sides. If a line is transparent, you can see and walk through it. If a line is empty, then there’s no texture on it.
Vertex (pl. vertices)
A vertex is a point at either end of a bounding line that defines the edge of a polygon. Every line has two vertices.
Platform
A platform is a polygon which has the ability to move up and/or down. A platform may be one of two types: Doors are special types of platforms and can be opened and closed by the action key, or a platform, which is a movable polygon which the player can stand on and be transported up or down.
Draw Mode
Forge has two editing modes. Draw Mode is Forge’s 2D representation of a map. This looks similar to the map view in the game when the player presses ‘M’ except that additional information is available.
Visual Mode
Visual mode, Forge’s secondary mode, uses a 3D representation of the world which is similar to playing the game. In this mode the weapons manifest is replaced by a palette containing the current texture collection. Furthermore, the mouse can be used to place and move textures around on the sides of polygons. Lastly, there are no monsters or weapons visible, though scenery will be displayed.
Back To Top
Chapter 16: Menu Descriptions
Menu Descriptions
File Menu
New Level
Creates a new level.
Open
Allows you to open an existing level or map.
Close
Closes the current file.
Save Scenario
Allows the current level to be saved. Merged maps should not be edited and saved.
Save Scenario as...
Allows the current level to be saved under a different name.
Merge Levels...
Compiles individual levels into a single Map file.
Export Level...
Allows a level to be exported from a previously merged Map file. This process extracts only the level and not terminal texts or the embedded physics model.
Quit
Quits Forge.
Edit Menu 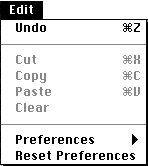 Undo
Undo
Will undo the most recently performed action.
Preferences...
There are three Preferences in this section. Graphics lets you modify Visual Mode resolutions and brightness. Key Settings allows you to modify keyboard settings. Colors lets you change the most prominent colors used in Draw Mode.
Levels Menu
This menu will display the name of the currently active level. In an unmerged level this will be just one name. However, in a merged map you can navigate between individual levels.
View Menu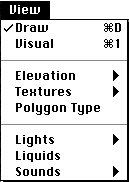 Draw Mode
Switches to the 2D overhead map view. All polygon creation and object placement is done in this mode.
Visual Mode
Switches to the 3D view. Texture placement, alignment, and height adjustments are done in this mode.
Elevation
Shows a 2D view of ceiling and floor elevations by color coding heights. Elevations may range from -9 W.U. to +9 W.U.
Textures
Allows you to modify floor and ceiling textures.
Polygon Type
used to assign specific values to polygons (ie. Monster Impassible, hill, etc.).
Lights
Shows ceiling, floor and liquid light intensities. Also allows these settings to be edited and new light types to be defined.
Liquids
The liquids menu lets you create and edit new liquid types and assign them to polygons.
Sounds
Here you can create and edit random or ambient sounds and assign them to polygons.
Special Menu
Zoom In/Zoom Out
Allows the visible level area to be enlarged or reduced.
Map Manager
This palette lets you customize some Draw Mode Parameters. The options are: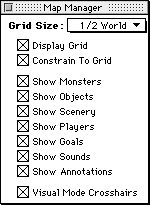
Grid Size
Selects the resolution of the grid.
Display Grid
Toggles the grid on or off.
Constrain to Grid
This will constrain all line vertices to the currently displayed grid. It only constrains when you create a new line, not when you move it.
Show Monsters, etc
These checkboxes allow you to toggle objects and annotations on or off in 2D mode.
Visual Mode Crosshairs
The crosshairs are used as a visual aid to place textures in 3D mode (when using the Space bar). This checkbox allows you to toggle the crosshair on or off.
View Height Window
These two vertical sliders control the currently visible floor to ceiling region. If a level has a lot of overlapping polygons at different heights, this feature lets you isolate the view to show only the polygons you’re working on.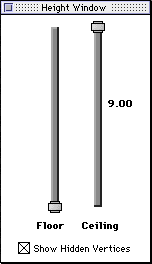 Goto...
Sometimes an error message will indicate that a specific polygon is convex or that something else is wrong. The error message will indicate the offending polygon by its number. Use the Goto command to quickly locate that polygon, line or vertex.
Set Level Parameters
This allows you to make changes to a level’s parameters. Here you can change texture collections, landscapes, etc. The dialog will also indicate whether or not the current Level is compatible with both Marathon 2 and Marathon Infinity or just Marathon Infinity.
Set Item Parameters
Allows the number, frequency and randomness of placed objects to be edited.
Set Monster Parameters
Allows the number, frequency and randomness of monsters to be edited.
Recenter Level
This command will take your entire map and physically recenter it to the map.
Pave Level
Will take three generic textures from the current collection and texture all non-textured polygons in the level. One texture for the floor, one for the ceiling, and one for the walls.
Nuke Objects Only
Will remove all objects from the level.
Nuke & Pave Level
This will remove all textures and objects from the map (but not liquids). If you want to import maps created in Pfhorte (a shareware Marathon level editor), you need to Nuke and Pave the map before working with it in Forge. This will eliminate most map incompatibilities.
Back To Top
Chapter 17: The Tools
The Tools
These tools are available from the tools palette in Draw Mode. Keyboard shortcuts are in parenthesis. Arrow (A)
Used to select vertices, lines, polygons and objects. Double-click on a vertex or line to make even finer adjustments. Line Tool (L)
Used to draw polygon outlines. When constrain to grid is off, holding down [Shift] will this tool allows you to ony create lines in 45º increments and holding [Option] down constrains the line length to whole multiples of the current grid size. Fill Tool (F)
Fills the polygon created with the line tool. This assigns the polygon default floor and ceiling elevations and turns it into a valid 3D space. Polygon Tool (P)
Used to create generic polygon outlines with a fixed number of sides. Double-click on this tool to set the polygon type. Note: the vertices generated by this tool aren’t linked to any outside of this polygon so they have to be manually connected to other polygons. Hand Tool (D)
Drags the visible region of the level. Hold down the spacebar in any top-down view mode to change the current tool into the hand tool. Zoom Tool (Z)
Zooms the map in large increments. Hold down the option key to zoom back out. Command + and command - also zoom the map in and out but in much smaller increments. Holding down [Option] and clicking zooms out. Text Tool (T)
Places text notes inside the current polygon. This text will be visible from within the game when the user views the map. It’s used to name rooms or regions of a level. To modify existing annotations, double-click on them with the arrow. Object Tool (O)
Places objects on the map. Objects include items, player locations, monsters, fixed sound sources, scenery, and level goals.
Back To Top
Chapter 18: Setting Up Basic Map Parameters
Setting Up Basic Map Parameters
The Level Parameters dialog shows whether or not a level is compatible with Marathon 2 and Marathon Infinity or just Infinity. Your map is compatible only with Infinity if your map: Uses the Jjaro texture collection, contains vacuum Bobs, the SMG, or SMG ammo.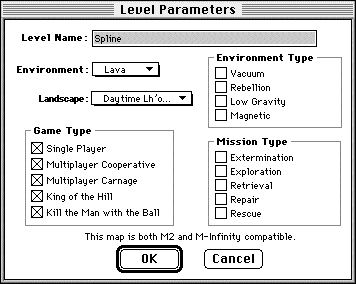 Options
Environment
This selects the texture set for the level. The available sets are: Water, Lava, Sewage, Jjaro and Pfhor. You can change texture collections at anytime during your map making process by changing the environment. Be careful, this will reset all your textures to the three defaults.
Landscape
Sets the background image (sky) for the entire level.
Game Type
This sets the game play options for the map.
Environment Type:
Vacuum
In a vacuum level, the player uses his internal oxygen supply (which will diminish over time), and only the pistol, fusion pistol, SMG, Shotgun, and Alien Weapon work.
Rebellion
Some monsters, such as the Compilers, will fight on the side of the player. The player also starts out with no weapons and low health, and in ’hands-down’ mode. Rebellious aliens are set by changing the physics model for that level with Anvil.
Low Gravity
Gravity is low. Duh.
Magnetic
The motion sensor is inoperative most of the time and gives false readings.
Mission Type:
Extermination
The player must Kill everything.
Exploration
The player must Explore all polygons labeled as ‘Must be Explored’.
Retrieval
The player must Find items, ie. all the Uplink Chips and S’pht keys placed on the Map.
Repair
The player must reset all switches flagged as repairable.
Rescue
The player must make sure that 50% of the civilians (Bob’s) survive.
Back To Top
Chapter 19: Tutorial One: A Simple Two-Polygon Room
Tutorial One: A Simple two-polygon Room
In this section we’ll be creating our first two polygon room. You’ll find that making a level is nearly as fun and challenging as playing it. Using the 2D Draw Mode we'll be creating two interconnected polygons, and then “fill” them to make a valid 3D space. We’ll then go into the 3D Visual Mode to texture our newly-created room.
World Units Explained
In Marathon and Forge, the common unit of measurement is the World Unit (WU). In the real world, a World Unit would be about 2 meters. Let's take a closer look at some dimensions in Marathon...
Maps in Marathon can be up to 64 WU x 64 WU in area. Heights can range from -9 WU to +9 WU. This means you get a volume of 64 x 64 x 18 = 73,000 cubic world units or about 590,000 cubic meters to play around with in Forge. That's a lot of space!
All textures are 1 WU x 1WU. To avoid obvious seams between the walls and floor, most corridors in Marathon are 1 WU tall and 1 WU wide. The player, which is 0.8 WU tall, can easily go blasting down these corridors. the highest step which the player can climb per step is about 0.25 WU tall.
When a map is created, Forge displays a window with what looks like a blank piece of graph paper. Evenly spaced on the grid there are vertices slightly darker than the others, these are the bounding corners of rectangles that are exactly one WU in size. The resolution of the map’s grid can be changed by using the Grid Manager (in the Special menu) or alternatively through use of the numeric keys 1 through 5. Pressing 1 will give a grid size of 1/8th WU and 5 a size of 2 WUs.
Let's Make a Level!
Open Forge and create a new level (select the New Level menu item or type Command-N). Next, give your level a name and select an environment and landscape. Finally, click on the Multiplayer Carnage checkbox since we'll be creating a network level. That’s it, now hit the OK button.
You'’ll be presented with a large size grid. Go to the tool bar and select the line tool. Now, click and hold at any vertex on the grid and drag the line to the next dark vertex so that the line is 1 WU in length. Notice that the line just dropped has a red point at each end; these are the vertices. Continue creating lines until a square is created. The outline should look something like this: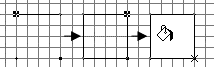 Now comes the most important step: select the Fill Tool from the palette and click inside the polygon outline you’ve just created. It will fill the newly-created outline, turning its insides white and making it a valid space in the 3D world. If all goes well it should turn white.
To fill properly a polygon must be convex. That means all its internal angles have to be less than 180 degrees. It also cannot have more than eight vertices. To build larger rooms or polygon shapes, make them out of multiple smaller polygons. Also, keep in mind that you cannot connect two lines together by dragging the vertex of one line onto the other. For example, if you create two parallel lines (that are not connected to each other in any way) and try to drag the vertex of one line onto the vertex of the other line, the points will not connect.
If you select one of the vertices of the square you just built and dragged it towards the diagonally opposite corner, you’ll notice that a red striped texture will appear in the polygon. This means that the polygon is now concave (non-convex). When you attempt to save a map that has a concave polygon or switch view modes, Forge will bring up a dialog with the polygon’s id number. When you hit OK, it will goto that polygon and select it for you. Here you can fix the polygon.
Now that the first polygon has been filled, the temptation might be to go into Visual mode and see what it looks like. All movement in Marathon is based on the connectivity between polygons. If you ever drop the player into a room with no adjacent polygons, weird things will happen...try it and see!
Once a polygon has been filled, new lines can only be attached to its vertices, not along one of its sides. Go ahead and add another polygon adjacent to your square. It should look something like this: Once filled this new polygon will connect with the first one as long as they share a common side. Before you can go into Visual mode you will need to create a starting position (or entry point for the player). Select the Object tool (skull) and click in one of your polygons. The Edit Object dialog will appear:
 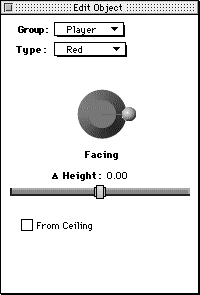 Now enter Visual Mode by selecting it from the View Menu or by pressing Command-1. You can also choose where you want to go into visual by Command-clicking on the map. The X that appears where you clicked will be your entry point.
And... wow! Everything is white. That’s because your newly created room doesn’t have any textures in it.
In Visual Mode, the top two-thirds of the screen show the same 3D display you would see in the game. Instead of a weapons manifest, the bottom third is a texture palette. A red square surrounds the currently selected texture. the first five textures are switch, terminal and pattern buffer textures. The rest are polygon textures and the last one is the landscape texture (if it is selected in the Level Parameters dialog).
Pick one of the normal textures and click anywhere in the white space in the 3D View window with the mouse. That texture is now applied to the polygonal surface where the mouse is. Repeat this until all the white space is gone. It should now look very much like a regular level. Forge uses the same movement keys as the game, so move around and fill all remaining white polygon sides.
There are several important commands available in Visual Mode. Clicking with the mouse places a texture. Dragging a texture to align it is as simple as dragging the mouse on the texture to be modified. However, if a wall texture is the same across several connected polygon sides then all similar textures will be moved along with the one currently selected. Most of the time this is the way editing is supposed to work. However, the following commands will change the nature of how texturing works:
Spacebar
Works just like a mouse click to place the current texture on an adjacent polygon. The difference is that the spacebar places a texture onto the polygon nearest the center of the screen.
Caps Lock
This key selects the Height Adjustment Mode and indicates it by turning the border of the 3D View red. This mode allows the mouse to move floors or ceilings up or down in increments of 0.05 WUs. Just click and hold the mouse button down on the floor and drag the mouse up or down to see this in action.
Jump key (Keypad 9)
To get to those awkward places...
Shift-Click
Places the texture on the nearest line rather than on a polygon side. If you use a semi-transparent texture, such as a grating, then it will look like a window. If you want to erase this transparent texture, double-click on the line in Draw Mode and check the ”Empty” box.
Option-Click
Samples the texture and light from the selected polygon.
Control-Drag
Retextures the selected surface and lets you align it independently of the adjacent walls.
Command-Drag
Drags individual polygon textures but retains its texture/light setting. If the wall is untextured, the current texture will be applied to the wall.
Shift-Option-Click
Like Option-click but for the nearest line.
Shift-Control-Drag
Like Control-drag but for the nearest line.
Shift-Command-Drag
Like Command-drag but for the nearest line.
Control-Command-Drag
Drags an individual texture, retaining its texture/light settings.
Shift-Control-Command-Drag
Like Control-Command-Drag but for the nearest line.
F5 Function Key
Toggles between high-resolution and low resolution mode.
In addition, there are two pop-up menus, light and texture mode, at the top of the texture palette. The light pop-up menu is used to assign light intensities to textures on walls, ceilings, and floors (more on how to create your own lights later). The Texture Mode pop-up menu offers several options that control the way textures behave.
Tutorial One is now complete. Save this level and prepare for Tutorial Two.
Back To Top
Chapter 20: Tutorial Two: Windows & Platforms
Tutorial Two: Windows and Platforms
This tutorial will introduce ceiling and floor heights, as well as basic uses of platforms for the creation of doors and elevators. The level Tutorial 1 in the Tutorial folder on the Marathon Infinity CD-ROM can be used as a base for this Tutorial.
Making a Window
Open the Tutorial 1 map or your own level. From any of the two polygons previously created connect a small square polygon to these two vertices so that the level map looks like this: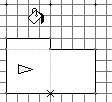 Fill this new polygon and add a larger polygon on its opposite side to make a room into which the player can see. Go into Visual Mode and texture everything. For now the polygon which we will turn into a window looks like a doorway, because it uses the same floor and ceiling height as the other polygons around it. To make it a window we need to change these heights.
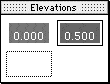
Floor and ceiling heights can range from -9 to +9 WUs. The default floor height is 0 and the default ceiling height is 1. To create our window we’ll need to create two new heights, one for the floor and one for the ceiling. Using the Elevation - Floor menu you can create new floor heights.
Next to the red square in the Elevations palette is a white square with a gray border. Double-click on this rectangle to create a new floor height and type in 0.50. Now click on the polygon we want to make into a window. You’ve just changed the height of the floor to 0.50. To change the ceiling height of the window, go to the Elevation - Ceiling menu and create a new ceiling height. This time enter the number 0.80. Once again, click on the window polygon. The window will now have a floor height of 0.50 and a ceiling of .80. Now go into Visual mode and texture the sides of the window. Making a Door
Next we’ll create a platform polygon which will become our door. Create a new set of three polygons in the same way as above (two large polygons with a small polygon in between them). All door textures in Forge are 1x1 WUs in height and width so it’s a good idea to make this polygon 1 WU wide and about 1/4 WUs thick; this is the size of a standard Marathon door.
Once these polygons have been filled and textured, click on the small polygon with the arrow. This will bring up a floating window labeled “Edit Polygon.”
Now select platform from the type pop-up menu. Then click on the Platform Parameters button. You’ll be presented with a rather scary-looking dialog like this: 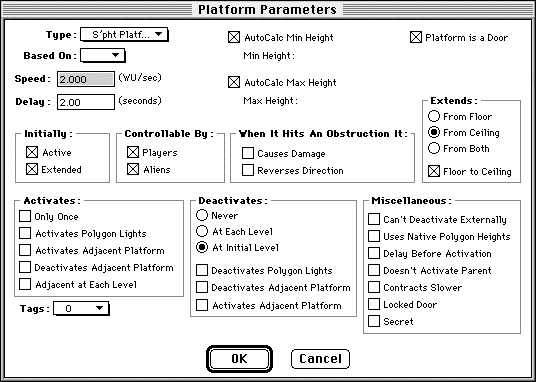 Under the Type pop-up menu, select a door type. The main difference between a platform and a door is that the player can activate a door by using the action key
The following parameters can be changed in this window:
Initially
Active
The platform starts out moving.
Extended
The Platform starts in its fully extended position.
Controllable By
Players
The Player can open or activate the platform.
Aliens
Monsters can open or activate the platform.
When It Hits Obstruction It
This determines the platform’s behavior when the player or a monster gets caught in a closing door, or between a platform and the floor or ceiling. Causes Damage will make it crush the player, while Reverses Direction makes it bounce off him. Both can be checked to hurt just a bit.
Extends From
Floor
The platform comes up from the floor.
Ceiling
The platform comes down from the ceiling.
From Both
The platform is split so that half extends from the floor and the other half extends from the ceiling.
Floor to Ceiling
The platform automatically calculates its height so that it will extend completely from the floor to the ceiling.
Activates
Only Once
The platform will activate only once.
Activates Polygon Lights
As it starts moving, the platform will turn the polygon’s lights on.
Activates Adjacent Platform
A platform in any adjacent polygon (ie., one that shares at least two vertices) will activate at the same time as this one.
Deactivates Adjacent Platform
Reverse of the above.
Adjacents at Each Level
This platform will activate adjacent platforms at each elevation it comes to (ie., at floor level and ceiling level).
Deactivates
Never
This platform will always be active.
At Each Level
The platform will stop at each floor and ceiling level.
At Initial Level
The platform will only stop when it returns to the initial level. This is the standard setting for doors that automatically close behind the player.
Deactivates Polygon Lights
As the platform deactivates it will turn the polygon’s lights off.
Activates Adjacent Platform
platforms in any adjacent polygon (ie. one that shares at least two vertices) will activate when this one stops.
Deactivates Adjacent Platform
Reverse of the above.
Miscellaneous
Can’t Deactivate Externally
If the platform is controlled by a switch or if it is a door, it won’t stop if the switch is hit again or if the player hits the action key again.
Uses Native Polygon Heights
The platform will use the height of its own polygon as ceiling and floor.
Delay Before Activation
The platform pauses before activating.
Doesn’t Activate Parent
If the platform was activated by another polygon (its parent), then it won’t re-activate that parent polygon.
Contracts Slower
The platform will move slower when it’s contracting than when it’s extending.
Locked Door
The platform is locked and it will make a “won’t open” sound when someone tries to activate it. This is usually used for doors that must be unlocked or don’t lead to anywhere.
Secret
Secret platforms won’t show up on the player’s overhead map as a red polygon.
These parameters will come in handy later on, but for now use the default settings. Click OK. Your platform polygon now has a number on it. This number is used as a reference ID for switches that can control platforms. This topic is covered in Tutorial Five.
Enter Visual Mode and select a door texture from the texture palette and place it on the door. The action key will operate doors and switches within Visual Mode. To test out your new door, open the door, walk through and texture the other side. Make sure you texture both the top and the bottom of your door —untextured sides look ugly in Marathon.
Congratulations, your new door is now complete. 
Back To Top
Chapter 21: Tutorial Three: Liquids & Lights
Tutorial Three: Liquids and Lights
This part of the tutorial will introduce liquids and lights. Each level can only feature one kind of liquid. For example, you can’t have both water and lava in a level. You set the kind of liquid available from the Environment pop-up menu in the Level Parameters dialog.
Begin by selecting one of the large polygons in your level. Change the floor height to -2 WUs.
Now from the View Menu select Liquids. You’ll see the familiar color palette on the right. Double-click on an empty square to create a new liquid type: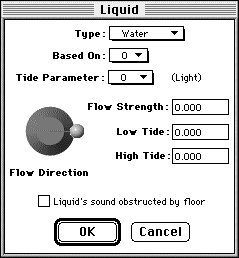
The following parameters can be changed in this window:
Based On
To save time in setting up additional liquid types, you can load previously defined liquids using this pop-up menu.
Tide Parameter
Since the intensity of lights can vary (discussed later), you can use the same set of parameters to control how your liquid’s tide varies.
Flow Direction
This dictates the direction the liquid flows.
Flow Strength
This controls the speed of the flow. Pick a number between 0 and 1...we suggest values <0.1 for most liquids.
Low Tide
the lowest point to which the liquid recedes (in WU).
High Tide
The liquid's topmost level (in WU).
Liquid’s Sound Obstructed by Floor
If two polygons overlap and the lower polygon is filled with a liquid, the sound of the liquid will be heard in the polygon above if this is unchecked.
In the High Tide box type in -0.1. For Low Tide, type in -2.0. This means the liquid can reach a maximum height of -0.1 and minimum of -2.0. Once the liquid has been created it can be selected and placed on any polygon. Select your liquid type and click on the polygon. The gray box in the Liquid Palette is used to remove a liquid after it has been placed. Enter Visual Mode to see the liquid. It should appear to come up to almost the top level of the surrounding polygon floors, ie. a floor height of -0.1 WUs or so.
To make the liquid more dynamic, it would be nice if it not only had a current (as it does) but also a phase or tide. To create this effect, we need to provide our liquid with a tide parameter. Since the tide parameter uses the same variables as lights, let’s create a new “light” to control the tide.
To create a new tide go to the View Menu and select lights - liquids. You’ll see that you already have 21 predefined lights (numbered 0 through 20) which range from 0% intensity to 100% intensity. Double-click on the white square to create a new light.
Active and Inactive
Lights in Marathon can do strange and amazing things like flicker, pulse, or fade. To make these special effects we need to set certain parameters to control the Active and Inactive stages. When a switch is assigned to a light and the switch is activated, the light will first go through the Becoming Active stage. This period dictates how long, in 1/30th secs (also called ticks), it remains in this state. For example, in the dialog to the right, when the light is turned on, it shines at 100% for 30 ticks, or 1 second. You can use this stage to make a light flicker (like a fluorescent light does when it is first turned on), before it becomes fully active. After it finishes Becoming Active it switches to the Primary Active state. Here it will go through its period and then switch over to Secondary Active. From then on it will go back and forth from Primary Active to Secondary Active until it is turned off. This is useful to create a light that, for example, slowly fades from dark to bright.
If the switch is turned off, the light will immediately go to the Becoming Inactive stage. Then to Primary Inactive and Secondary Inactive stages. At this stage it will go back and forth between Primary Inactive and Secondary Inactive (until the switch is turned on). Remember that if the primary and secondary active stages have the same values, the light will be constant once it is turned on.
You can connect a switch to a light using the tags pop-up menu. Keep in mind that anything which executes a tag can be used to activate or deactivate a light.
The following parameters can be changed in the Light Parameters window:
Preset
Standard preset lights.
Based On
Gives the new light the same settings as a previously defined light.
Phase
Marathon’s standard measure of time is 1/30th of a second. For every tick of Marathon’s clock, it checks to see how a light must be changed. A light’s phase is a delay between that point and when it actually activates. The phase of a light begins at zero but this option lets you change that. Entering 15, for example, will shift the light’s phase by half a second.
Function
The light is given a function for how it changes state. A constant light either doesn't change at all or does so instantaneously. A linear light will change intensity as if it was controlled by a rheostat. A smooth light changes intensity following an exponential scale. A flickering light will change intensity by randomly flickering between values converging on the final intensity.
Period
A light’s period is the length of time its active phase is on. This number is based on 30th's of a second. Thus a value of 60 is the same as 2 seconds.
Δ Period
This indicates the maximum random amount of time added to or subtracted from the standard period of the light.
Intensity
A percentage value indicating the strength of the light (or the height of the liquid’s tide). 100% intensity is the maximum intensity.
Δ Intensity
Does for Intensity what Δ Period does for Period.
Stateless
A stateless light will cycle non-stop through all the stages in the following order: Becoming Active, Primary Active, Secondary Active, Becoming Inactive, Primary Inactive, Secondary Inactive.
Initially Active
The light is initially in the Primary active state.
Tag
The light or liquid is turned on and off by the tag indicated.
Since we’re creating a tide for our liquid, select Liquid Tide from the Presets menu. Set the secondary active intensity to 50% and set the tag in the Tags pop-up menu to None.
Now go back to liquid mode, select the newly created liquid and assign it a tide parameter of 21, ie. the light just created. Enter Visual Mode and test that the light is working properly by applying it to a wall texture (select the texture, change its light to number 21 and paste it onto the wall). The wall should now slowly change from bright to fairly dark. Check the liquid, it should now be undulating as well, from 50% of its height to 100% over the span of ten seconds.
Tutorial Three has now been completed – be sure to save the map.
Back To Top
Chapter 22: Tutorial Four: Sounds
Tutorial Four: Sounds
Adding ambient and random sounds to your map file can make your levels richer and more life-like.
Ambient and Random Sounds
Ambient sounds are used to give a level atmospheric sounds. For example, wind, and water sounds can be placed throughout a level to give it an outdoor feel. These sounds are placed much the same way as liquids and lights.
Select Sounds - Ambient Sounds from the View Menu. you’ll see an overhead view of your map with the familiar palette on the right. double click on the empty box in the sounds palette to create a sound type. Here you can select a sound and adust the sound volume (ranging from 0 to 100%). After you’ve created it, you can place sounds on polygons much like lights and liquids.
Random sounds (ie., dripping water, thunder, etc) are created and placed the same way as ambient sounds and both types can be placed on the same polygon.
Random sounds, however, have additional variables you can adjust so you can make them, well, more random. here you can change their volume, direction, period, and pitch.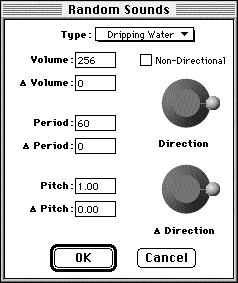 Volume and Δ Volume
Volume can be any integer between 0 and 100 where 100 is maximum volume. The Δ volume is used to vary the volume randomly.
Period and Δ Period
The period of a sound is the length of time that sound can be heard. In terms of units, a second is equal to 30 ticks. Thus, a two second sound with a two second delay would have a period of 60. The Δ period is the time in ticks (30 per second) that is added or subtracted from the base period. This provides a random element to the sound each time it is generated.
Pitch and Δ pitch
The default pitch of a sound is 1. To increase or decrease the pitch, raise or lower this number. The Δ pitch adds a random element to the pitch. For example, to make thunder sound close and/or farther away.
Sound Objects
Sounds, like weapons, scenery, and monsters, can also be dropped as objects. This is mainly used to place sounds like sirens, fans, and electric hums in a particular room. Use the Object tool to place a sound object on a polygon. The following options will be available:
Type
A list of all sound types currently available.
Volume
Select a range of between 100% volume (max.) and 1% (min.). Between 50-75% is good for most levels.
Δ Height
A sound is generated on the floor of a polygon by default. However, this slider allows the sound to be placed anywhere within a -9 to +9 W.U. span.
Is On Platform
A sound placed on a platform polygon and has this check box selected will only sound while the platform is in motion.
From Ceiling
The sound is by default placed on the ceiling rather than on the floor
Floats
If placed on a liquid the sound will float on top of that liquid.
Use Light for Volume
Instead of setting a fixed volume level for the sound this allows a light source to be used as a volume controller. If that light source changes intensity (brightness) then the sound will change its volume the same way.
Back To Top
Chapter 23: Tutorial Five: Switches & Terminals
Tutorial Five: Switches and Terminals
The most interesting maps use switches to control lights, platforms and liquids. They also have terminals and pattern buffers for use in single-player levels. This section will introduce the various types of switches available, and show how terminals are created and their text generated.
Open the map from the previous Tutorial. switches, terminals and buffers need to be placed from within their own polygons To give them a 3D quality. Most switches are 1/2 WU wide and 1/2 WU in height. Terminals and pattern buffers are 1 WU in width and 1/2 WU or 1/4 WU in height.
To place a terminal or buffer you need to create a polygon somewhere along a wall that’s at least 1 WU long. Create a polygon 1 WU wide and 1/8 WU deep. Set the floor height to 0.4 and the ceiling height to 0.9.
Fill the new polygon, then enter into Visual Mode and texture everything. Notice how your addition forms an alcove. Select the fifth texture in the texture palette (the texture with both a terminal and a pattern buffer on it). Pasting this texture will probably require some dragging to get it aligned just right. But first set its parameters using the dialog which appears as soon as the texture is placed.  Select the pattern buffer (save terminal) and hold down the Command key while dragging the texture to adjust it without bringing up the parameters dialog again. The pattern buffer is now complete. A terminal is placed much the same way. The only difference is that the terminal has an additional variable called Script. This pop-up menu selects the terminal text resource used when the player activates the terminal. Give the terminal a script number of zero and hit OK. Note that terminals and pattern buffers are only active within the game itself. To use them, a level has to be merged into a map. This merging process will take the individual levels, level physics, chapter screens,terminal text and merge them into one big map file.
Terminal Editing
When terminals are placed, you use the script pop-up menu to indicate the terminal’s ID number. This should always start with zero, not one and corresponds to a specific piece of text contained within a text file. When merged, this text file is placed within the map file and the terminal becomes usable. See Tutorial 8 for more on merging maps.
The text file can be generated using any text editor such as SimpleText will do nicely. The PICT resources are contained in a Terminal PICTs document that you create using ResEdit, available at Apple's web site, www.apple.com. Here is a list of the terminal text commands you can use:
The ";" is used to mark comments.
#TERMINAL n starts terminal n, where n is the terminal’s ID number. This should always start with zero as should the scripts for the terminals in the level.
#LOGON n will display a PICT with resource n. This PICT will fill most of the screen with a small amount of room at the bottom for text.
#UNFINISHED indicates the commands to display if level goal has not been completed.
#FINISHED indicates the commands that will be displayed when the level goal has been completed.
#INFORMATION will display a page without any graphics, only the text and commands you indicate.
#PICT n will display a screen with a PICT with resource n. The PICT will be displayed on one half of the screen and the text you indicate will be displayed on the other half.
#CHECKPOINT n will display on one half of the screen a picture of the overhead map with object goal n (as opposed to the polygon goal) circled. Text will be displayed on the other half of the terminal screen.
#INTERLEVEL TELEPORT n teleports the marine to level n. Setting n to 256 will end the game and return the player Marathon's main menu screen.
#INTRALEVEL TELEPORT n teleports marine to polygon n.
#LOGOFF n works just like logon but displayed when logging off the terminal.
#END ends finished or unfinished section of text.
#ENDTERMINAL n ends terminal n.
The text commands are:
$Cn changes colors of text to color n, where n can be any number between 0 and 7. The following colors correspond to the numbers:
0 – light green
1 – white
2 – red
3 – dark green
4 – light blue
5 – yellow
6 – dark red
7 – dark blue
$B starts bold text. $b ends bold text.
$I begins italicized text. $i ends italics.
$U starts underlined text. $u ends underline.
So a typical terminal text would be as follows:
#TERMINAL 0
;sample terminal
#UNFINISHED
#LOGON 1600
#PICT 10000
$C6You must kill $B$Ieverything$i$b you find and not return until your
deed is done$c6
#LOGOFF 1601
#END
#FINISHED
#LOGON 1600
#PICT 10001
Good work. Onward we go.
#LOGOFF 1601
#INTERLEVEL TELEPORT 01
#END
#ENDTERMINAL 0
Probably the best way to learn terminal text editing is to get the Marathon Map Splitter and check out the terminals that were made by Bungie by splitting the Infinity Map file. You will need ResEdit to view the PICT resources and any text editor, such as SimpleText to view the actual terminal commands.
Back To Top
Chapter 24: Tutorial Six: Objects and Polygon Types
Tutorial Six: Objects and Polygon Types
This tutorial will introduce the Object Placement Tool (the skull shape in the tool palette). This tool is used to place all items onto the map. For convenience, all scenery objects (lights, fans etc.) are visible in Visual Mode.
Open the current map or use Tutorial Five’s map as a starting point. Add a few more interesting polygons and then select the Object Placement Tool and click in a filled polygon. This brings up the Edit Object floating window.
The default object is the player, as indicated by the group pop-up menu. The group types are: monster, scenery, object, player, goal and sound. Below this is the Type menu, which provides types of objects in the group currently selected. Last is the Activated By menu. This is only relevant to the monster group and governs how monsters are activated to life. They can be activated by the player’s presence, in a random fashion, by a goal, or by any hostile creature.
Directly below these menus there is a control to set the direction in which the object is facing. This is only available for monsters and players; for sounds, you’ll see a volume slider there instead. there is also a horizontal slider governing the height from the floor (or ceiling) at which the object appears. This option works in conjunction with one of the check boxes below. If the From Ceiling check box is selected, the height is from the ceiling of the current polygon; if it is de-selected, the height is from the floor. Don’t set this number to be below the floor for any object or above the ceiling as strange results occur.
Monster and Scenery Check Boxes
Teleports In
When it activates, the monster teleports to this location.
From Ceiling
The monster’s placement height is determined relative to the ceiling of the object’s polygon. This is useful if the object’s polygon is very high and the monster is teleporting into the air so that it can fall to the floor below.
Is Blind
A blind monster will not activate even if it can see a player or hostile.
Is Deaf
A deaf monster will not activate even if it is within earshot of a weapon being fired.
Teleports Out
The Monster teleports out when the job is done.
Objects (Weapons) Check Boxes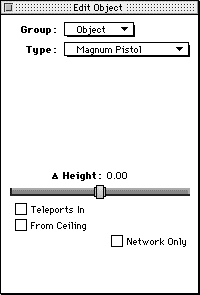
Teleports In
objects are teleported in rather than found lying around on the floor. these items are activated by an item trigger polygon (covered later) to make it appear as if Durandal or some other entity is sending the player weapons and ammunition.
Network Only
This object only appears in network games. This is used in co-operative and single-player maps to make sure there are enough weapons to go round.
For players the check box available is From Ceiling and works as above. The goal group has no options.
Sounds Check Boxes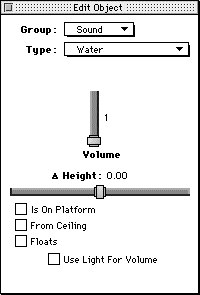 Is on Platform
Check this if the sound is on a platform.
From Ceiling
The sound’s Δ height is made relative to the ceiling rather than the floor. This is useful when there are high ceilings where sounds appear to originate from far above.
Floating
The sound’s height will move along with the platform or liquid’s height.
Use Light For Volume
This brings up a pop-up menu which allows a light to be indicated as the volume controller for the sound’s volume. This works in the same way as a light controlling the undulation of a liquid. This also allows a switch that controls a light to also control a sound.
To make monsters and objects truly effective they have to be used in conjunction with certain polygon types. Select Polygon Type from the View Menu to see a long palette of various polygon options.
Polygon Types 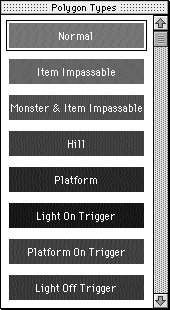 Normal
A normal polygon.
Item Impassable
Will not allow random items (ie. weapons) to appear on it.
Monster & Item Impassable
Will not allow random monsters or items to appear on it. In addition, monsters will not cross a polygon marked monster impassable.
Hill
Sets the hill location for the King of the Kill network game.
Platform
Creates a basic platform with default settings.
Light On Trigger
Switches on a light, specified by its number, when a player steps on the polygon.
Platform On Trigger
Same as above but for platforms.
Light Off Trigger
Turns the specified light off.
Platform Off Trigger
Deactivates the specified platform.
Teleporter
Allows a destination polygon to be set and will teleport the player to that location if he comes to a complete halt within the polygon. The player will always appear in the exact center of the destination polygon. Teleporters function in Visual Mode.
Zone border
See below.
Goal
Makes the polygon a goal. Aliens within the Zone Border will activate right away and make their way to the goal. Once there, they will teleport out.
Visible Monster trigger
See below.
Invisible Monster Trigger
See below.
Dual Monster Trigger
See below.
Item Trigger
See below.
Must Be Explored
If the level is an exploration mission (set in the Map Parameters dialog) then the player must walk on these polygons to finish the level.
Auto Exit
Works like a teleporter but will cause the player to exit the level as if from a terminal.
A Special Note on Triggers, Borders and Zones
These polygon types deserve special mention, not because they’re especially difficult but because we know that we’ll get endless e-mails about them. So here goes. Imagine that the map is a pond. A stone is thrown into the middle of that pond and concentric circles of ripples appear, expanding outwards from the point of impact.
Now, imagine that the stone is actually a trigger polygon and the ripples are the signals sent out to wake up monsters. To block these signals all polygons in the signals’ path have to be defined as Zone Border polygons - ie. a Zone Border works as a buffer zone between two trigger areas.
In most cases there’s a ledge or a door or even a window causing the signal to leak out of its zone. use a Zone Border to block this. Remember that the signal will only travel between adjacent polygons.
The easiest way to keep track of intricate zones is to make fairly flat maps that don’t overlap too much.
In the saved sample map for this tutorial there are four monsters. From left to right they are normal, blind, deaf, and the fourth is marked as deaf, blind and invisible. Play this map using Infinity and get a feel for the way in which the monsters activate.
Refer to the Tutorial 6 map to view a sample of how polygon types and objects can be placed.
Back To Top
Chapter 25: Tutorial Seven: Network Levels
Tutorial Seven: Network Levels
This section explores the differences between network levels and single-player levels. A network level differs from any other in two distinct ways. First, it should not have terminals or pattern buffers. Second, it has to cope with the continual regeneration of players as they are killed and re-enter the level. The first issue is a simple map-making constraint. The second, however, depends on making weapons and ammunition appear continually. This process is governed by the Set Item Parameters and Set Monster Parameter dialogs. Since both of these use the same dialogs they will be discussed simultaneously.
This is the Item Parameter dialog obtained from the Special menu: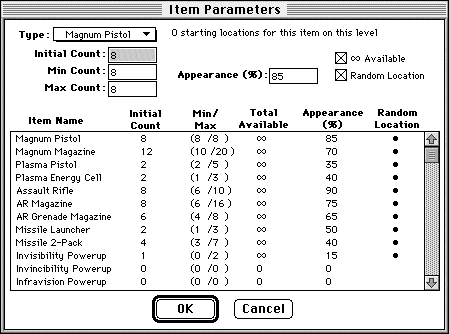
Type
A pop-up menu of all available objects.
Initial, Min, Max Count
The Initial count is the number of these objects that appear when the level is first started. The Min. and Max. fields determine how many objects of this type can exist on the level at any one time. The minimum number is the minimum amount of objects that exist and the Maximum number defines the upper limit of this range. Remember that for weapons and unloaded ammunition, a weapon carried by a player counts towards this maximum.
Total Available
This is the total number of objects that will appear during the duration of the level or network game.
∞ Available
When checked, the level will never stop producing the selected object.
Appearance
pearanceThis percentage determines the probability of an object appearing each second.
Random Location
Objects will appear in any valid polygon except for Monster Impassable, Item Impassable and Zone Border polygons. If this setting checked, don’t bother using the object tool to define locations for this object.
The easiest way to have weapons appear properly is to follow these simple rules:
1) Mark all small polygons, such as window ledges, switches and rechargers as monster and Item impassable. This ensures that weapons and monsters will never appear there. This is a good rule of thumb for regular levels too.
2) Play the level as a single player to test it. Fire all weapons and use up all ammunition to see if it indeed does regenerate properly.
Back To Top
Chapter 26: Tutorial Eight: Building Map Files
Tutorial Eight: Building Map Files
The merging process turns a collection of single levels into a playable map. The merging gets rid of that annoying message; “This map was not created with Bungie’s tools.” The merging process also lets you add chapter screens, terminal texts, terminal screens, and embedded physics models into your map
Keep in mind, though, that you cannot edit a merged map file. You should always edit unmerged map files.
1) To begin the merging process first create a folder for merging.
2) place all of your levels into the folder. Use the following naming conventions:
Scenario Levels L#.Level name (where # is the level number)
Net maps are named as: N#.level name
Physics models: P#.level name
Terminal text files: T#.level name
The level name, terminal text file name and the physics model name have to be exactly identical except for their prefixes. The merging process will skip any files that do not exactly match their counterparts.
3) Place all pictures, sounds and clut’s into their respective positions in the Terminal Pict.rsrc file.
4) Using Forge, select merge maps from the file menu. Select the Merge folder and open the first map. The merging process will begin after you have selected a location to save the merged map file. Do not save this file into the build folder.
5) Play your new map.
6) if anything has gone wrong with the merging process, open the file called “merge log”, located in the same folder as the Forge application.
How to place Chapter Screens, Chapter Sounds and Clut’s.
To create a chapter screen it has to be placed into the Terminal Pict.rsrc file by using ResEdit. Chapter Screens are placed into the pict resource and for them to work have to use the following convention: resource id = 15XX where XX is the level number of where the chapter screen should appear. In other words, a chapter screen appearing before the first level has an id of 1500 and a screen appearing before the second level, level 01, has a resource id of 1501. The same is true for sounds and the chapter screen clut’s. If you do not add the appropriate chapter screen clut with the correct ID the chapters screen will not be displayed properly.
Terminal Pictures
Terminal pictures also have to be placed into the pict resource. However, their resource id’s can be anything as long as you remember what numbers they have when they are called in the terminal text. Terminal picts are placed using ResEdit.
Back To Top
Chapter 27: Tutorial Nine: Advanced Features
Tutorial Nine: Advanced Features
These advanced features discuss trivial and not-so-trivial methods of adding spice to a level.
Overlapping Polygons
As any player of Marathon’s “5D Space” level knows, there are ways to trick the engine into creating impossible situations. One method is to create overlapping polygons. It’s possible to create two polygons that share the same space in x, y, and z co-ordinates while still making them separate regions. See the Tutorial file called Tricks to see this effect in action.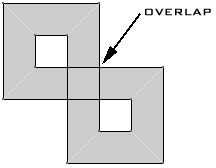 Tags
Tags
Tags can be assigned to any number of platforms, doors, sounds and lights. All tagged devices ‘listen’ to that tag and will change their state when that tag is activated. Thus a single switch can open a door to a room, raise the level of water, turn off a light, or turn off a sound. All at once! There are 15 available tags, more than enough for any map.
Goal Points
A goal object is used with the terminal text. If the #CHECKPOINT n command is used the map will center on that location and display it alongside the terminal text. These are also placed with the object.
Goal polygons are also used with monsters. If you set the monster to activate on a goal, they will make their way to that polygon and teleport out, ie. exit the level. These are set in the polygon setting dialog box.
Negative Space
It is faster and cleaner to create a pillar or other solid object out of negative space rather than out of a polygon. Negative space is a part of the map where there aren’t any polygons. Surrounding an area of negative space will make that area look as if it’s a solid pillar or other object. To create negative space, don’t fill the polygon you want to use as a pillar. This method can also be used to break up rooms that are extremely large.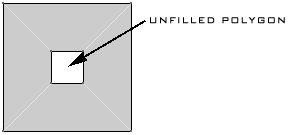 Multiple Level Rooms
With Forge you can create cool and unique “basement” rooms. To do this you should first create the basement, fill all the polygons, then set your heights. After that you can create your upstairs area by creating a room that engulfs the outer edge of the basement room. Then fill your outer room and set its height above the basement. If you need to create the upper room first, use the View Height Window to hide the upper room when you are ready to create your basement.
When you build these types of room keep in mind that you should not allow your basement vertices to touch or be on the vertices that make up the upper room. In the example below the basement is inside the larger upper room and none of the vertices for each floor touch each other.
Back To Top
Chapter 28: Forge Troubleshooting
Troubleshooting
Many aspects of level and map creation are confusing at best and downright illogical at worst. What follows is a section of common questions and their answers.
Q Can I import maps from Marathon 1 or Pfhorte?
A Yes, but always Nuke & Pave these maps before you start working with them.
Q In Visual Mode I sometimes get stuck on an invisible wall or can’t move.
A This usually happens if multiple polygons share the same line. Tweak the lines in different directions until the problem goes away.
In a related issue, try to avoid having a long straight line within the same polygon that has both solid wall sections and openings to other polygons.
Furthermore, sometimes a player will run through what appears as open space and suddenly end up in another part of the map (see diagram below). What occurs is that the player is unable to pass into the adjoining polygon and is placed into the default location of the current polygon, ie. its center. This can easily be fixed by changing the angle of the offending line a couple of degrees.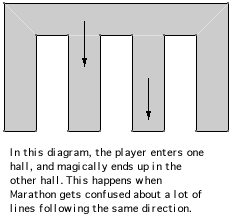
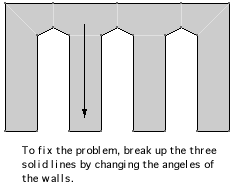 Q I need more help making maps! Where can I go for help?
A Visit our web site at www.bungie.com. We’ve set up a special section just for Forge. Here you can get answers to frequently asked questions.
Q None of the numbers make any sense in the heights.
A Processors prior to the PowerPC will display heights incorrectly. You will need to use a CPU with a PowerPC processor.
Back To Top
Chapter 29: Forge: Error Messages
Error Messages
Forge will present you with helpful error messages if something goes wrong.
Split Line Error
If you try to split a line (using the line tool) that is already part of a valid (filled) polygon, you will get a “can’t split a line” error message. To avoid this you should 1) create lines only at vertices or 2) delete the filled polygon by selecting it and then pressing the “delete” key. You’ll now be able to connect lines to the intended line.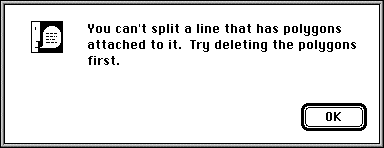 Viewing Distance error
When building maps you’ll need to be careful about viewing distances. If the viewing distance is too large, you’ll be presented with the “Viewing Distance” error message. So how far is too far? You’re safe up to about 28 world units. If you start seeing texture wigging out, then you know you’ve just about reached that limit.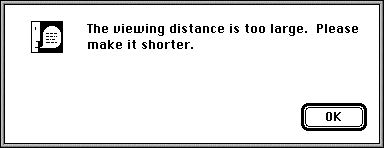 Too Many Polygons Error
If you build a flight of stairs that is extremely long or you build a room with many, many polygons, you will get a warning that you have too many transparent edges. This means you have to cut back on the number of polygons you are looking at from one point to the other. You can solve this problem by either 1) removing polygons, or 2) creating solid walls so that you never look through too many polygons at once. For example, if you have a 40 polygon room, build solid walls in the middle that reduce the number of polygons you are looking at once. 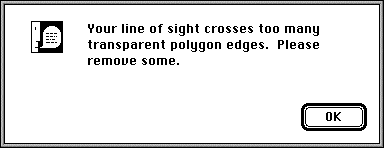 Not Convex Error
If a polygon becomes concave during your map building process, Forge will present you with a warning that a polygon is not valid when you try to go switch modes or save. The “ID” portion of the dialog box will give you the number of the polygon. Forge will automatically select the polygon for you so you can make changes to it.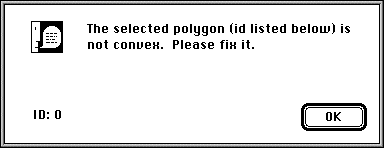 Zero-Length Line Error
If you accidently create a line that has no length, Forge will give you the following error when you try to save your map. Forge will automatically select the line for you, simply hit the delete key to get rid of the line.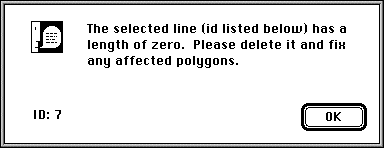
Back To Top
Chapter 30: Tricks of the Trade
Tricks of the Trade
The Invisible Polygon Line Barrier of Illogical Infinity
Try to avoid having a straight line between multiple polygons. Sometimes when a player crosses a polygon he appears to bounce back to the center of that polygon. This occurs when many polygons share the same line into another polygon. Just change the line slightly so that they no longer line up perfectly.
Untouchable Objects
AKA when a shelf is not a shelf. Objects are picked up as a player crosses over them. Placing objects on a shelf like polygon may prevent the player from picking them up properly.
Teleporter Directions
A player will face in the same direction after teleporting as he did when arriving on the level.
Limitations
There are limits to the number of polygons, lines and other elements that can be part of a level. Forge will bring up a dialog if you attempt to exceed these limits.
Max. number of polygons: 1024
Max. number of lights: 64
Max. number of sides: 4096
Max. number of vertices: 8192
Max. number of lines: 4096
Max. number of objects: 384
Max. number of liquids: 16
Max. number of platforms: 64
Max. number of annotations: 20
Max. number of ambient sounds: 64
Max. number of random sounds: 64
Max. number of tags: 16
Back To Top
Chapter 31: ANVIL: Introduction
 Anvil is an editor that lets you create and modify Physics, Shapes, and Sounds files from the Marathon Environment. It can create and edit physics models and duplicate, modify, or replace shapes and sounds. Using Anvil, you can create new weapons and monsters, change wall textures, add new sounds, and much more. Using advanced features, like creating a new monster from scratch, will take some effort and artistic talent, but Anvil includes quick-start features that get you going as soon as possible.
Anvil can edit files for both Marathon Infinity and Marathon 2: Durandal. The program will automatically translate as necessary, so that you can
cut-and-paste records between the different generations of files. You can also open Marathon 1 sound files to import sounds directly into Marathon 2 and
Marathon Infinity sound files.
Before we begin, a few words of caution are necessary. Anvil is a powerful yet complicated tool. You should only use some of the advanced features like creating new sounds, aliens, and textures if you have extensive experience with using editing tools and graphics programs like Photoshop. Experimentation is absolutely necessary!
IMPORTANT NOTE
Do not edit your original copies of the Shape and Sound files! Always keep a copy in a safe location so that if you damage a file you can restore it.
Quickstart
For all those who never read documentation, here’s a few suggestions:
- Always work with copies of your original files.
- If you have questions about a field, activate Balloon Help or click on the question mark icon to pop up the Anvil Help palette. Then point at whatever you’re wondering about.
Back To Top
Chapter 32: About The Files
About the Files
The names given to each of the Marathon environment files can be a little misleading, so we’ll start here with a quick glossary.
Physics Models
They contain a lot more than just physics. A Physics Model describes a wide range of variables that are subject to your manipulation, including:
Aliens
every character that moves around on the Marathon map, including players and civilians. You can edit their appearance, behavior, and vital statistics.
Effects
the small animations used by the Marathon environment to enliven your experience.
Shots
created by monsters and weapons, and represent the main type of interaction between the aliens and Neanderthal deathmongers like yourself.
Physics
stores the raw physical constants of the simulation like gravity and acceleration.
Weapons
the appearance and behavior of every weapon usable by the player.
Shapes
Shape files are organized into COLLECTIONS, each of which contain up to four user-editable types of data (not all of which are about Shapes, so stay alert!) A single collection might describe “Troopers”, or “S’pht”, or “Scenery”, and will contain some or all of the following:
Bitmaps
the simple graphics that are drawn on the screen during the game. Every shapes file contains hundreds of bitmaps and each collection may have over a hundred bitmaps itself. You can copy and paste these bitmaps into a graphics program like MacPaint or Photoshop for editing, or save them in SimpleText picture format.
Color Tables or Cluts
used to colorize the bitmaps in a collection. The Pfhor, Fighter collection, for example, might have a green, purple, orange, and blue color table for each of the four types of fighter.
Frames
represents a single step in an animation. Each frame specifies a single bitmap and provides information about the drawing rectangle, x- and y- coordinates of the origin, minimum light level required to see the graphic, and can be flipped vertically or horizontally to reduce the number of bitmaps required for all viewpoints.
Sequences
gathers frames into a logical order. Each sequence may actually contain up to 8 VIEWS, which describe a single action from a single perspective. The “Running” sequence of the Pfhor Fighter view, for example, strings together the four running frames of the Pfhor fighter from the front, sides, and back. Sequences are the only part of the Shapes file that are referenced by other Marathon files: the Physics Model will often reference a single sequence, and each sequence may refer to Sounds which are played during the animation. Of course, not all collections will use all of these data types. A wall collection, for example, has no animation and therefore does not contain any sequences.
Sounds
Sound files are the simplest files. They simply contain several hundred sounds that are played during the game. Each SOUND RECORD may actually contain up to 5 SOUNDS which will be chosen from at random if the “More Sounds” checkbox is checked in Marathon. If the “More Sounds” box is not checked, only the first sound will be used. A Sound file may contain separate records for the 8-bit and 16-bit versions of each sound. If you want to replace a sound with both an 8-bit and 16-bit version, you must replace the sound in both records.
Back To Top
Chapter 33: Using Anvil
Using Anvil
If you have questions about a field, activate Balloon Help or click on the question mark icon to pop up the Anvil Help palette. Then point at whatever you’re wondering about to get help. Sound familiar?
Editing Physics Models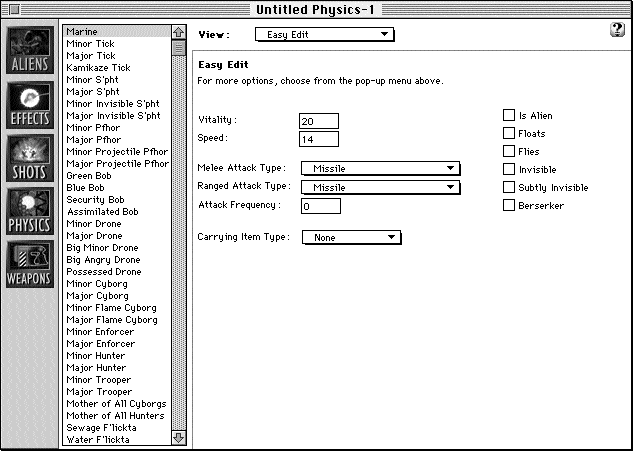
Anvil can create a new physics model which will duplicate the standard model provided with Marathon, or open a pre-existing model. To create a new model, select either “New M2 Physics Model” or “New Infinity Physics Model” from the File menu. To open an existing model, select “Open...” from the File menu to open it.
You may select which of the five sections of the model to edit by clicking on the buttons located at the left side of the window. To learn more about each of the edit fields displayed in the window, activate Balloon help or click on the question mark icon at the top-right of the window, and then point the mouse at the field you want to know more about.
Note that the monster and weapon sections are particularly large and complex, so they have a pop-up menu of editing options. They also include an “Easy Edit” setting, which provides one-screen access to the most frequently modified variables.
When you have finished editing the model, select “Save” or “Save As...” from the File menu to save your changes. Remember that to use your changes in Marathon, you will need to select Preferences, and then select “Environment” from the menu to obtain a list of available models.
Editing Shapes Files
You should never edit your original Shapes file. Instead, make a copy in the Finder by clicking on the Shapes file and select “Duplicate” from the
File menu. Then, open the Shapes file by selecting “Open...” from Anvil’s File menu.
The shape editor provides two basic screens: the bitmap screen (including color tables), and the sequence screen (including frames). In both screens, you can use the Collection pop-up menu located at the top of the screen to select which collection you wish to work with.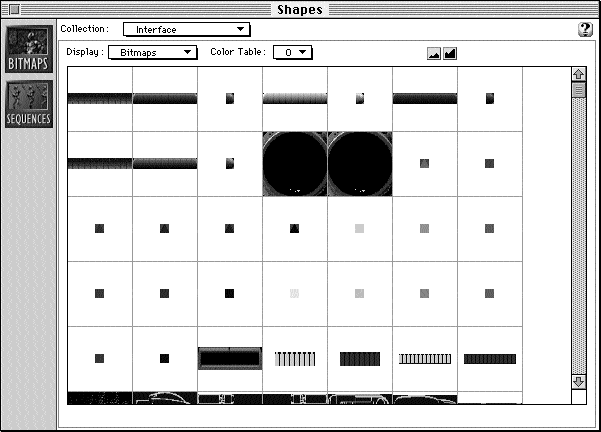 Some collections may be unused by the Shapes file and therefore contain no data. You can copy an existing collection into these slots for subsequent editing by choosing the “Clone Collection...” command from the Shapes menu while viewing an empty collection.
Editing Bitmaps
The bitmap screen allows you to export and import bitmaps from the Shape file, and change the color tables of the existing graphic collections. When displaying bitmaps, you can zoom the view of the bitmaps in and out by clicking on the “small mountains” (zoom out) and “large mountains” (zoom in) buttons, or double-click a single bitmap to create a zoomable, scalable preview window.
Marathon uses a medium blue color to mark transparent regions of the bitmap. If you want your graphics to have transparent regions, make certain you use this exact same shade of blue. If you use a graphics program that allows you to manipulate your color table such as Adobe Photoshop, make sure that this transparent color is the first color in the color table. To make it easier for you to keep your color table correctly aligned in Photoshop, Anvil provides an “Export Color Table to Photoshop” command in the Shapes menu.
To export a single bitmap to a SimpleText-readable picture file, click on it and select “Export Selected Item to PICT” from the Shapes menu. To export the entire collection into a horizontal strip of bitmaps (useful for editing in graphics programs), select “Export Collection to PICT” from the Shapes menu. You can also use the Copy command from the Edit menu, or press command-C, to copy a single bitmap into the Clipboard.
To import a new bitmap, click on the bitmap you want to replace and select “Import Bitmap from PICT” from the Shapes menu. You can also use the Paste command from the Edit menu, or press Command-V, to paste in a single bitmap from the Clipboard. If you previously exported an entire collection, you can import it by selecting the “Import Collection From PICT” command. Note that the dimensions of the imported picture must be exactly identical to those of the exported picture for Anvil to successfully complete this command.
The best way to prepare images for importing is to start with an existing bitmap to get the background blue right and use a graphic program to convert it to RGB Mode (in Photoshop) or thousands-of-colors mode for editing.
Once complete, convert the image back to Indexed (in Photoshop) or 256-colors mode for saving or pasting. If possible, the graphic program should be made to use the custom Marathon color table (in Photoshop, select “Custom” from the Indexed Color dialog box, then use the “Load...” button to load a stored color table). If you do not follow this procedure, you may not get the exact colors that your original file contained, because the Macintosh graphics system will need to make a “best guess” approximation.
Marathon restricts the colors available to all collections to those within a set of 256 “Standard” colors. When Marathon runs in thousands-of-colors mode, it will check the Shapes file for “Custom Colors” collections. Only the “Weapons in Hand” and Landscape collections have custom colors data. If you change the Weapons in Hand or Landscape graphics, you must also change their “Custom Colors” collection for the results to be visible when Marathon runs in thousands-of-colors mode.
Note also that when you import an image into a Walls collection, Anvil will automatically scale it to 128 by 128 pixels. You are advised to perform this scaling yourself, since you probably have a better idea of what your texture is supposed to look like.
Editing Color Tables
You can change any entry in the color table of any but the first 3 colors of each table (which are reserved for use by Marathon). To change a color, simply click on it and select a color from the standard Color Picker.
You can create a smooth blend between two colors by option-clicking on the first and then option-clicking on the second.
Editing Sequences and Frames
Sequences are used by Marathon and all of the other data files to bring several bitmaps together into an animation. When a collection is selected in the Sequence editor, a list of all the sequences contained in that collection is displayed in the Sequences list box.
One variable, the scale factor, is shared by the entire collection and is visible above the Sequences editor. The value entered here will be used to scale up the frames of every sequence in the collection, unless a sequence specifies a non-zero value for itself in its own scale factor box.
The timing, scaling, and sound variables controlled by the middle group of edit fields and menus affect the entire sequence. Below them, the Views list box allows access to the list of frames stored for each view.
Any sequence that is to be used for an attack must have a Key frame, which is set by the edit field at the bottom of the window. The attack will be launched when the Key frame is reached. The Loop frame, which is also set by an edit field at the bottom of the window, must be set if the sequence is to be used for a looping effect or projectile.
You can increase the number of frames per view by changing the value of the
“Frames/ View” box at the bottom of the window. If you change this value, Anvil will automatically create new frames or destroy old frames to compensate, but you will need to assign bitmap numbers to the new frames manually.
The frames editor occupies the right side of the window and allows changes to individual frames of a sequence. All of the editable parts of the frame window have on-line help available. When you have finished editing the shapes file, select “Save” or “Save As...” from the File menu to save your changes.
Remember that to use your changes in Marathon, you will need to select Preferences, and then select “Environment” from the menu to obtain a list of available shapes.
Editing Sounds
Making changes to the Sounds file is easy. You can review the contents of any Sound class record by selecting the sound class from the pop-up menu and clicking on the list of sounds (which will play automatically when clicked). If you wish, you can save any sound as a double-clickable System 7 sound by selecting “Save Sound as System 7 Sound” from the Sound menu. You can also copy the sound to the Clipboard by choosing “Copy” from the Edit menu, or by pressing Command-C.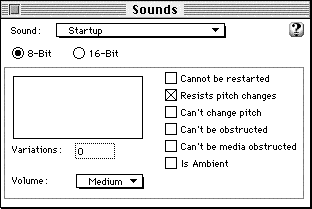 You can import a new sound by selecting “Import from Sound File” from the Shapes menu and then selecting any System 7 Sound or Marathon 1 Sounds file. If you wish to perform a more general import, select “Import From Any File,” which will allow you to select any file you wish (including other applications or the System file). If the file you select contains more than one sound, Anvil will provide a preview dialog box to let you the one you want. You can also paste in new sounds from the Clipboard by selecting Paste from the Edit menu or by pressing Command-V.
To replace an existing sound, click to highlight it, and then choose Import or Paste. To create a new sound, click below the existing sounds (so that none are highlighted) and then choose Import or Paste. When you have finished editing the sounds file, select “Save” or “Save As...” from the File menu to save your changes.
to use your changes in Marathon, you will need to select Preferences, then “Environment” from the menu, and finally select your new Sounds file.
Back To Top
Chapter 34: Legal: Selling Maps & Scenarios
Legal: Selling Maps and Scenarios
So you’ve built this great scenario using Forge and Anvil. What now? Can you charge money for it? Can you distribute the shapes, maps, sounds, and images file? These are tough questions. While we hope many scenarios and maps will be created using Forge and Anvil (and sent up to the net for everyone to enjoy), we want to discourage anyone from breaking the law.
Here are anwers to some frequently asked questions.
Q Can I modify and distribute the Marathon Infinity application along with a scenario I’ve built?
A No. Under no circumstantes are you allowed to modify or distribute the Marathon Infinity application.
Q I’ve added a new monster and a new sound to the Marathon Infinity shapes and sounds files. Can I distribute the modified shapes and sounds file?
A files that contain ANY Bungie artwork, sounds, or images cannot be distributed. You may distribute only original work you create. However, you may not charge money for them.
Q I’ve created a new monster and built a patcher that will patch the Infinity shapes file. Can I distribute this?
A Yes, as long as your patcher does not contain any Bungie copyrighted artwork, sounds, or images.
Q I modified a net level in Marathon Infinity, can I distribute it?
A You may not publicly distribute any modified or original levels from any Marathon game created by Bungie Software. However, you may freely release maps to the public that are your creations.
Q Can I charge money for a scenario I’ve built using Forge and Anvil?
A No. Even if you have created a scenario from scratch (using all new monsters, sounds, and graphics), the file formats contain specific data that we maintain the copyright on.
Q If I release a scenario to the net, free of charge, who owns the copyright?
A You own copyright on any original artwork and sounds that you create from scratch. However, the file formats (ie, shapes, sounds) contain specific data that we maintain the copyright on.
If you have any more questions about modifying or distributing Marathon related files created for use with Marathon, please get in touch with us.
Back To Top
Chapter 35: Credits
Production Manager
Tuncer Deniz
Development Manager
Eric Klein
"Blood Tides of Lh'owon" by Double Aught
Chris Geisel
Greg Kirkpatrick
Randy Reddig
Infinity Graphics
Randy Reddig
David Longo
Colin Kawakami
Beth Ulman
Programming
Alex Rosenberg
Jason Jones
Ryan Martell
Alain Roy
Infinity Interface & Icons
Chris McVeigh
Original Marathon Art & Graphics
Mark Bernal
Robert McLees
Product Assistance
Jay Barry
Jonas Eneroth
Sound Design
Alexander Seropian
Chapter Screens
Craig Mullins
Title Theme
Power of Seven
Damage & Spin
Alexander Seropian
Doug Zartman
Matt Soell
The Voice of Bob
Doug Zartman
Documentation
Tuncer Deniz
Alexander Seropian
Packaging
13th Floor
Alexander Seropian
Network Maps
Randy Redding
Greg Kirkpatrick
David Longo
Tuncer Deniz
Jonas Eneroth
Doug Zartman
Randall Shaw
Bill Ramsey
Forge Programming
Jason Regier
Additional Programming
Ryan Martell
Alex Rosenberg
Jason Jones
Quality Assurance
Jay Barry
Jonas Eneroth
Forge Documentation
Jonas Eneroth
Tuncer Deniz
Jason Regier
Forge Tutorial Movies
Chris McVeigh
Anvil Programming
Michael Hanson
Anvil Documentation
Michael Hanson
Testing
Jeremy Henrickson
Cruise Director
Pam Klier
Special Thanks
Beta Testers
Apple Testing Group
Bart Farkas
Kevin Williams
Hamish Sinclair
Chris Jensen
Stuff That Really Rules
Blue & White G3's
Photoshop
Claris Emailer
Iomega Jaz
BBEdit
Ehterwaves
T1 lines
Mullins’ art
Stuff that Doesn’t Rule
Junk e-mail
Censorship
Lame Summer Movies
Mouse Lint
Rich Levine
TechWorks
Final Thoughts
Blam
Your Mom
Dink
Back To Top